MPLS TE Fast Reroute (FRR) protects MPLS TE LSPs from link and node failures. We can do this with backup tunnels that repair the LSP of a primary (protected) tunnel. When the primary LSP is broken, we can continue to forward traffic down the backup tunnel until the headend router figures out a new best path. This takes less than ~50 ms. There are two protection types:
- Link protection
- Node protection
In the previous lesson, we covered link protection. In this lesson, we’ll look at node protection. The configuration is very similar, but some things are different behind the scenes.
Configuration
Here is the topology we’ll use:
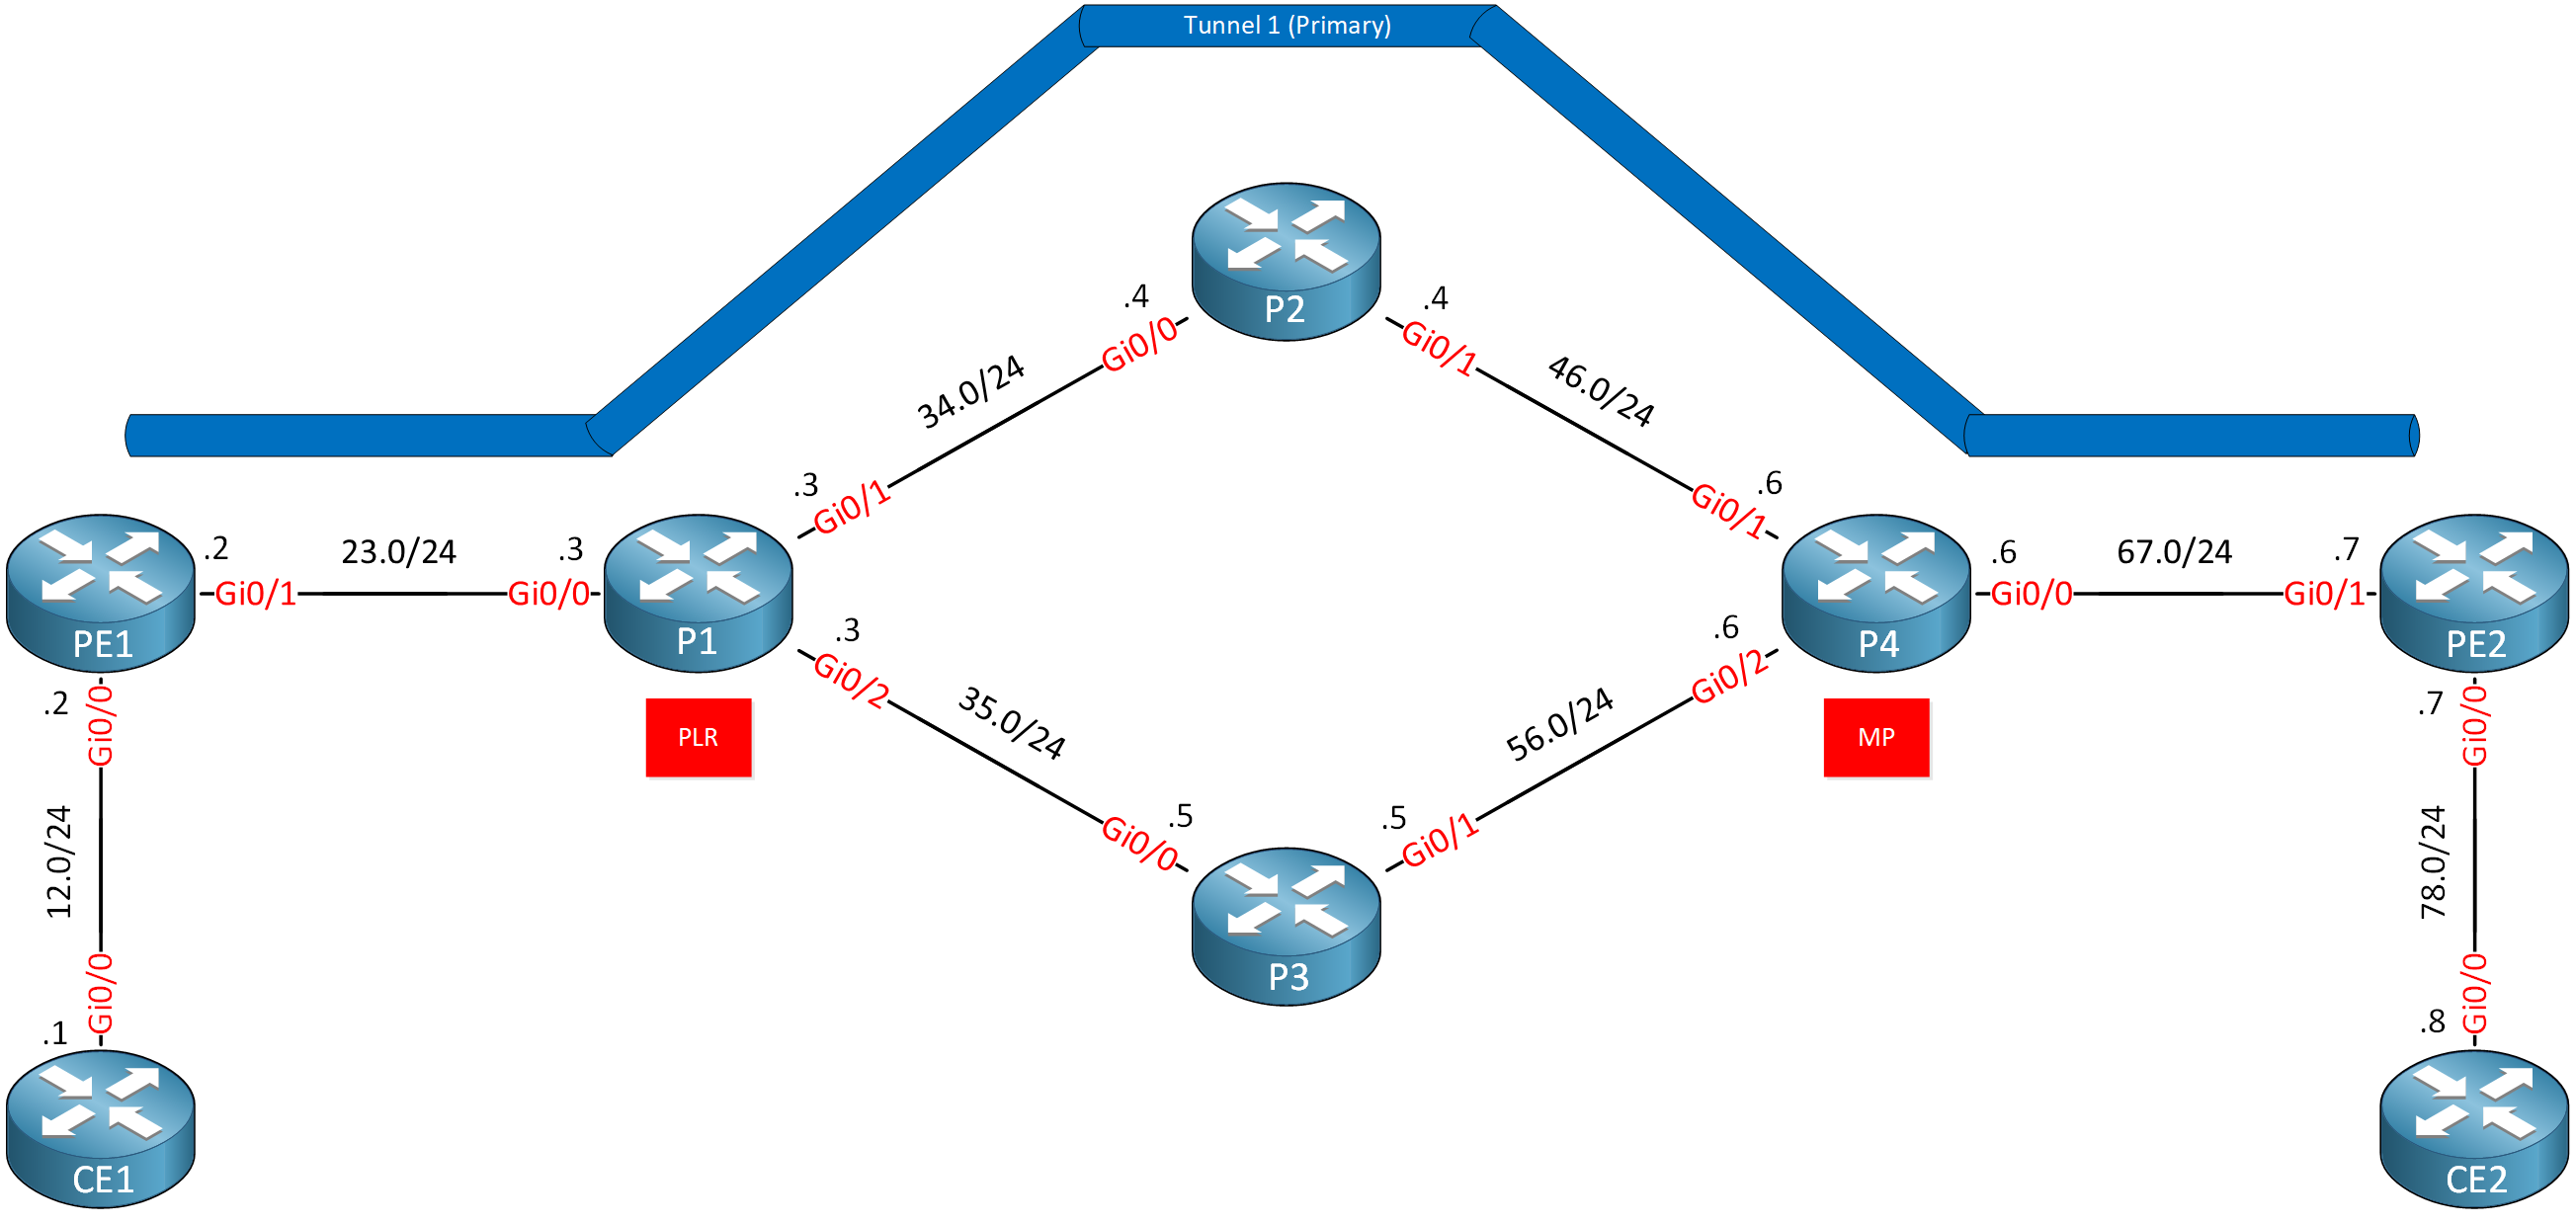
All PE and P routers run MPLS TE. We have a TE tunnel from router PE1 to PE2. Traffic for this tunnel goes through P2. We want to create a backup tunnel to work around a node failure (P2). Here’s what it looks like:
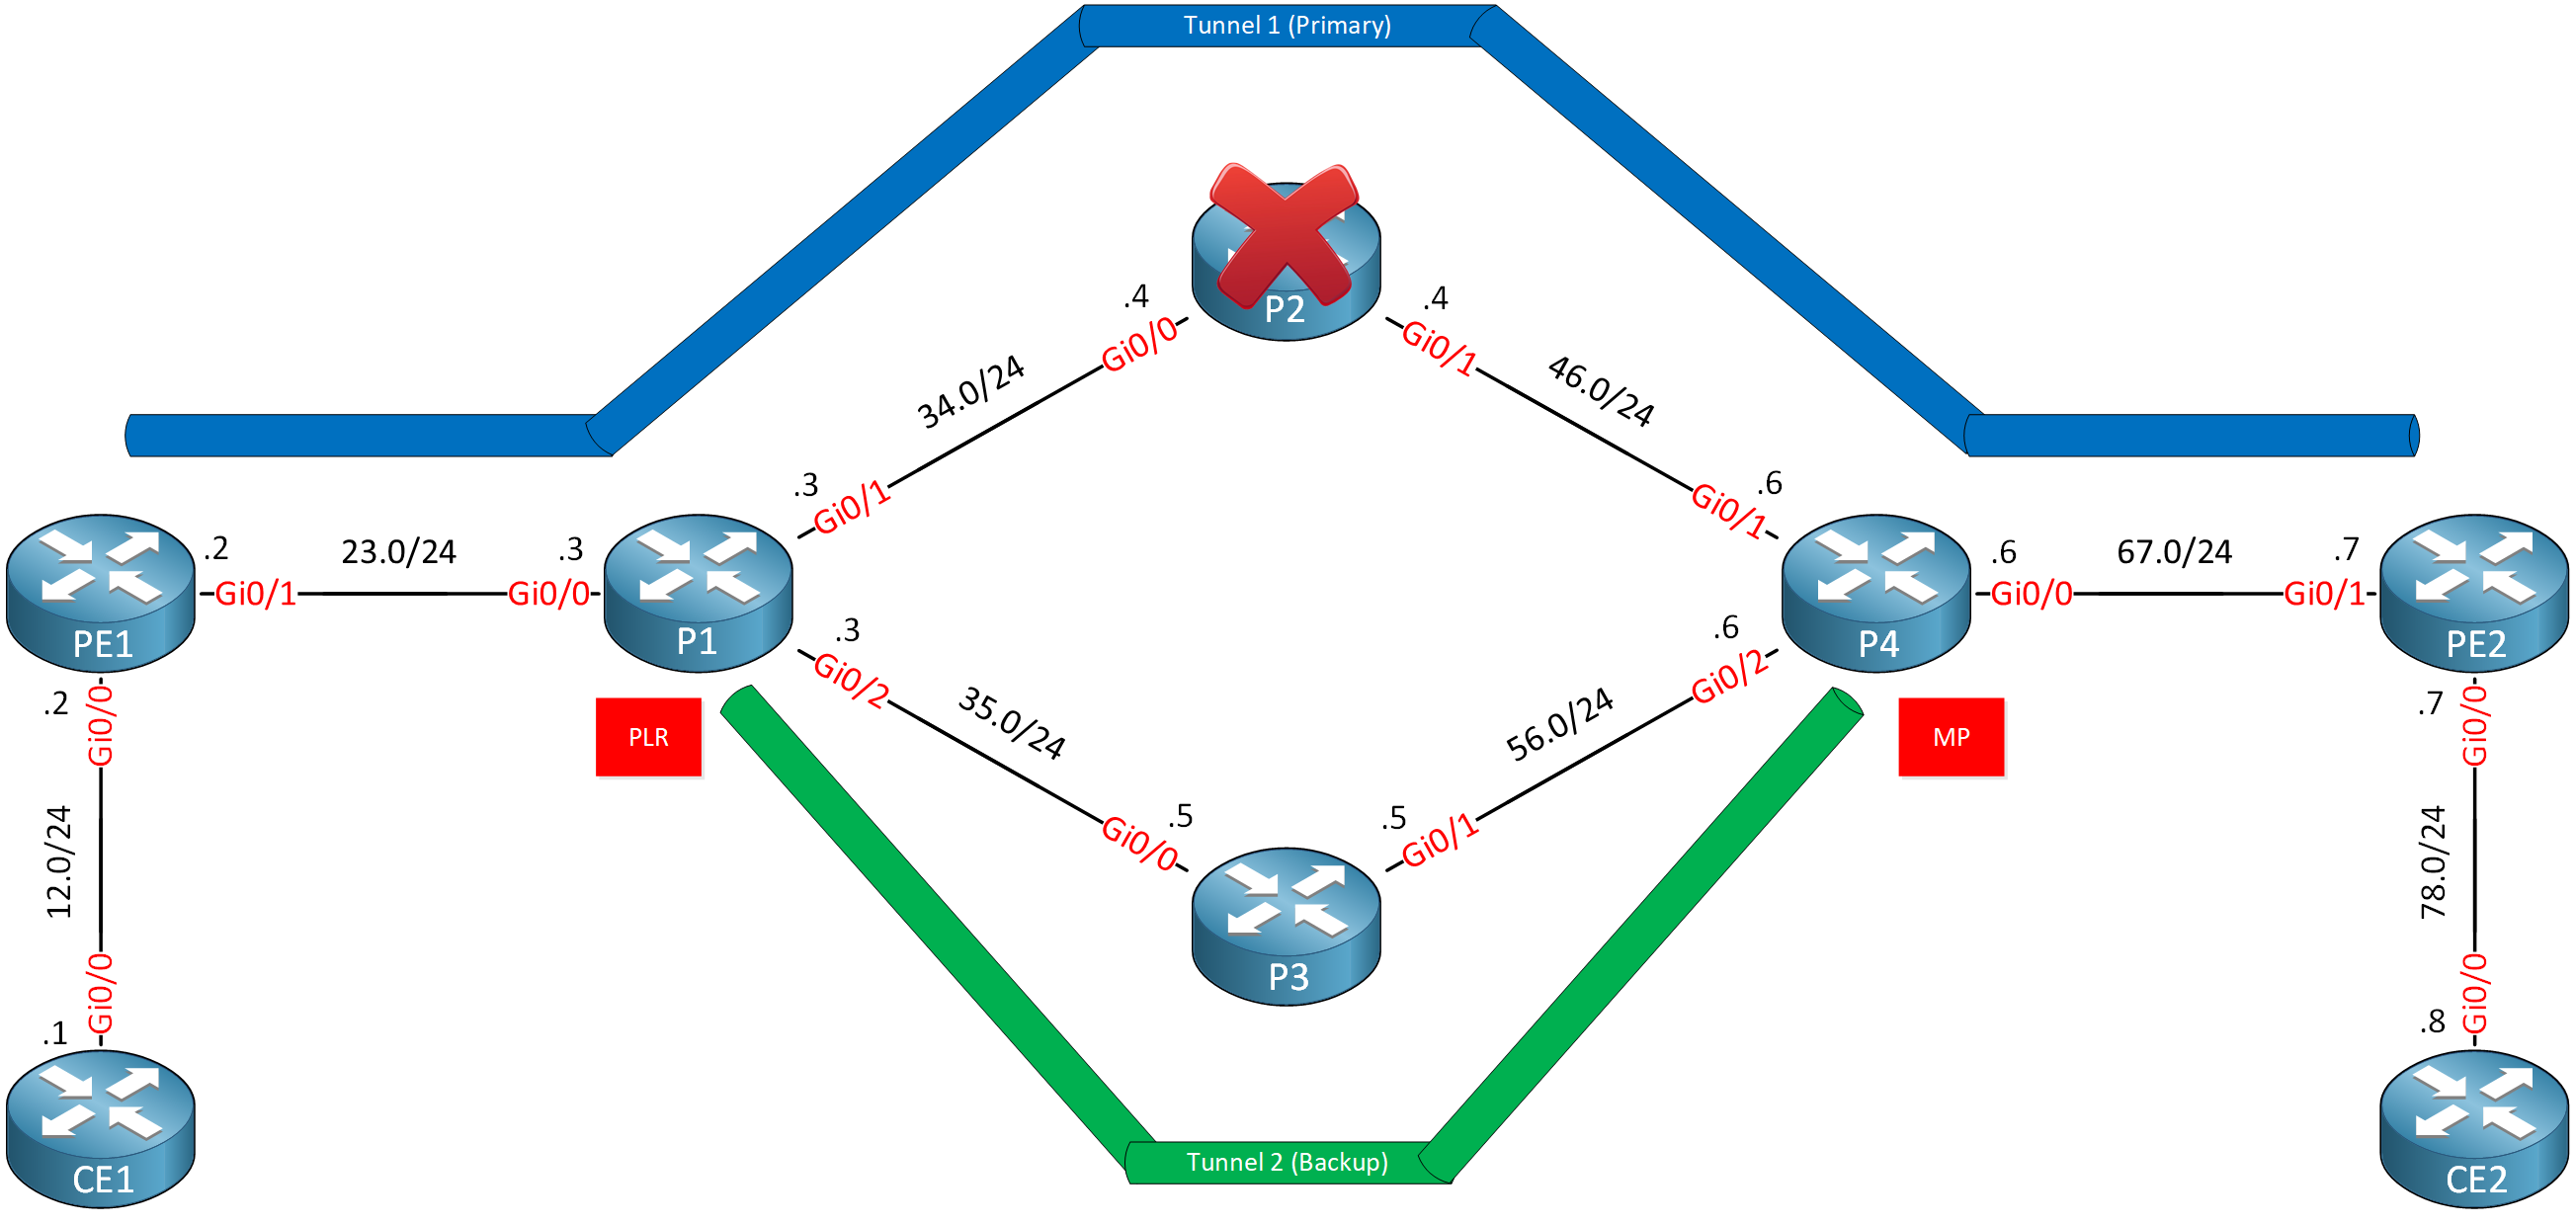
When P2 goes down, we want to send traffic down a backup tunnel that we configure on P1 and terminates on P4. This makes P1 the Point of Local Repair (PLR) and P4 the Merge Point (MP). We call this kind of backup tunnel a Next Next Hop (NNHOP) tunnel. From P1’s perspective, P4 is the next hop behind our next hop (P2).
- Configurations
- CE1
- CE2
- P1
- P2
- P3
- P4
- PE1
- PE2
Want to take a look for yourself? Here you will find the startup configuration of each device.
I use IOSv Software (VIOS-ADVENTERPRISEK9-M), Version 15.9(3)M4 on all routers. I have an explicit path on PE1 for the primary tunnel:
PE1#show ip explicit-paths
PATH EXCLUDE_P3 (strict source route, path complete, generation 6)
    1: exclude-address 5.5.5.5
This explicit path forces the traffic through P2. When P2 is unavailable, the tunnel will go down. This is important for this lab because, otherwise, once fast reroute is enabled, you’ll see that PE1 will use the backup tunnel only for a few seconds before switching over to a new path because of recalculation.
Without Fast Reroute
Before we enable fast reroute, I’d like to show you a packet capture of the RSVP PATH message. To capture this, we’ll restart the tunnel interface on PE1:
PE1(config)#interface Tunnel 1
PE1(config-if)#shutdown
PE1(config-if)#no shutdown
In the RSVP PATH message, you’ll see this under the session attribute:
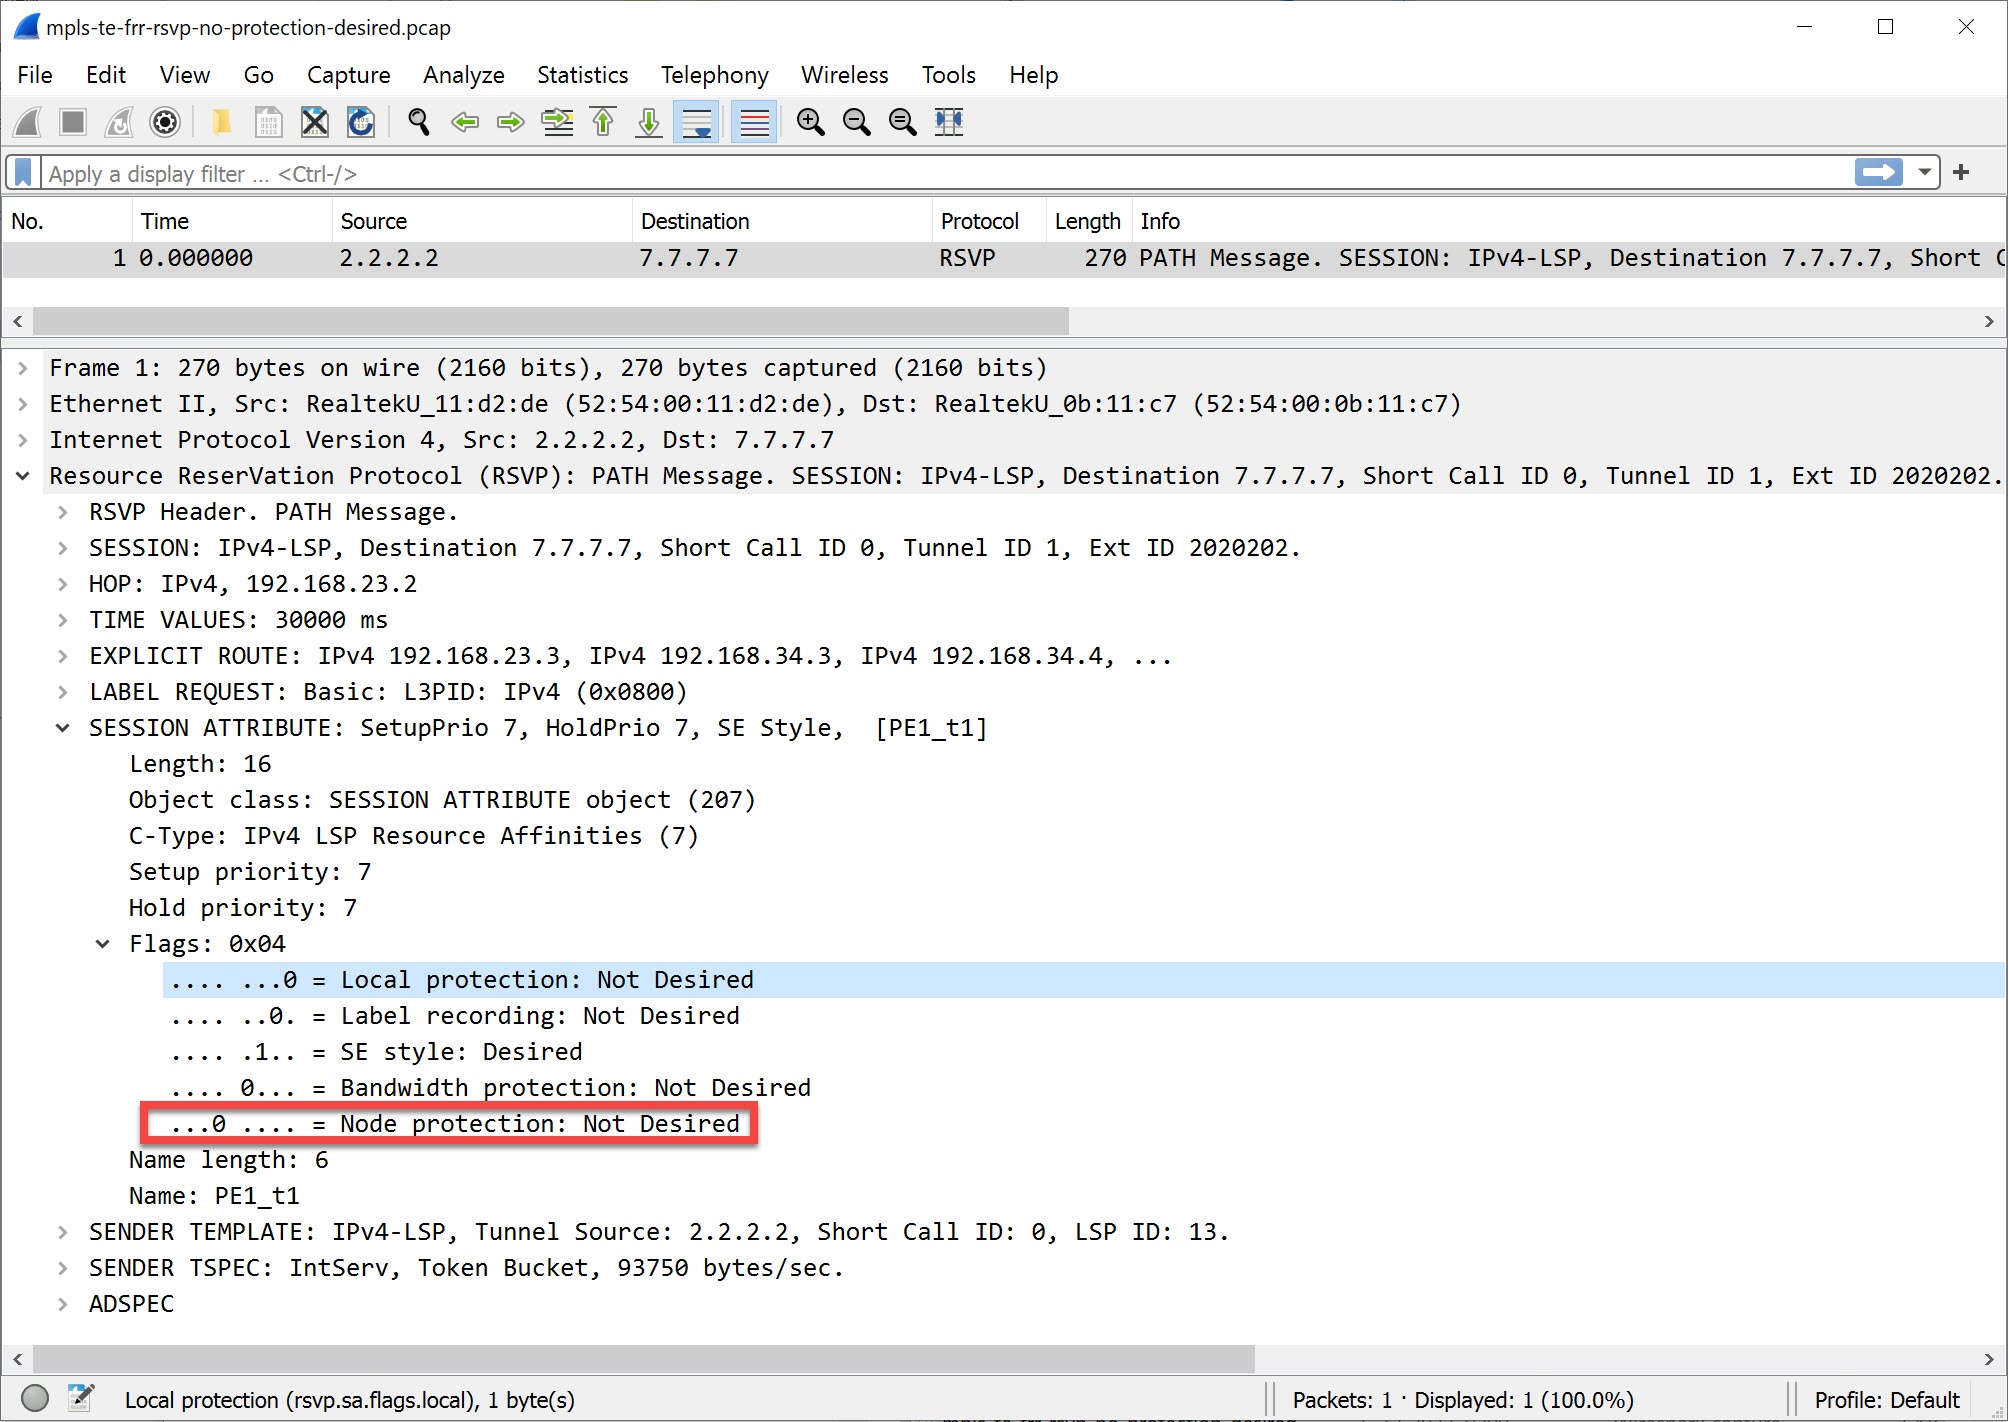
MPLS TE FRR RSVP no protection desired
Above, you can see that PE1 doesn’t require node protection.
With Fast Reroute
Let’s configure MPLS TE fast reroute node protection for this network.
PE1
We’ll start with PE1. We need to add one command to the tunnel interface:
PE1(config)#interface Tunnel 1
PE1(config-if)#tunnel mpls traffic-eng fast-reroute node-protect
The only difference with link protection is that we add the node-protect keyword. Let’s take another look at the RSVP PATH message:
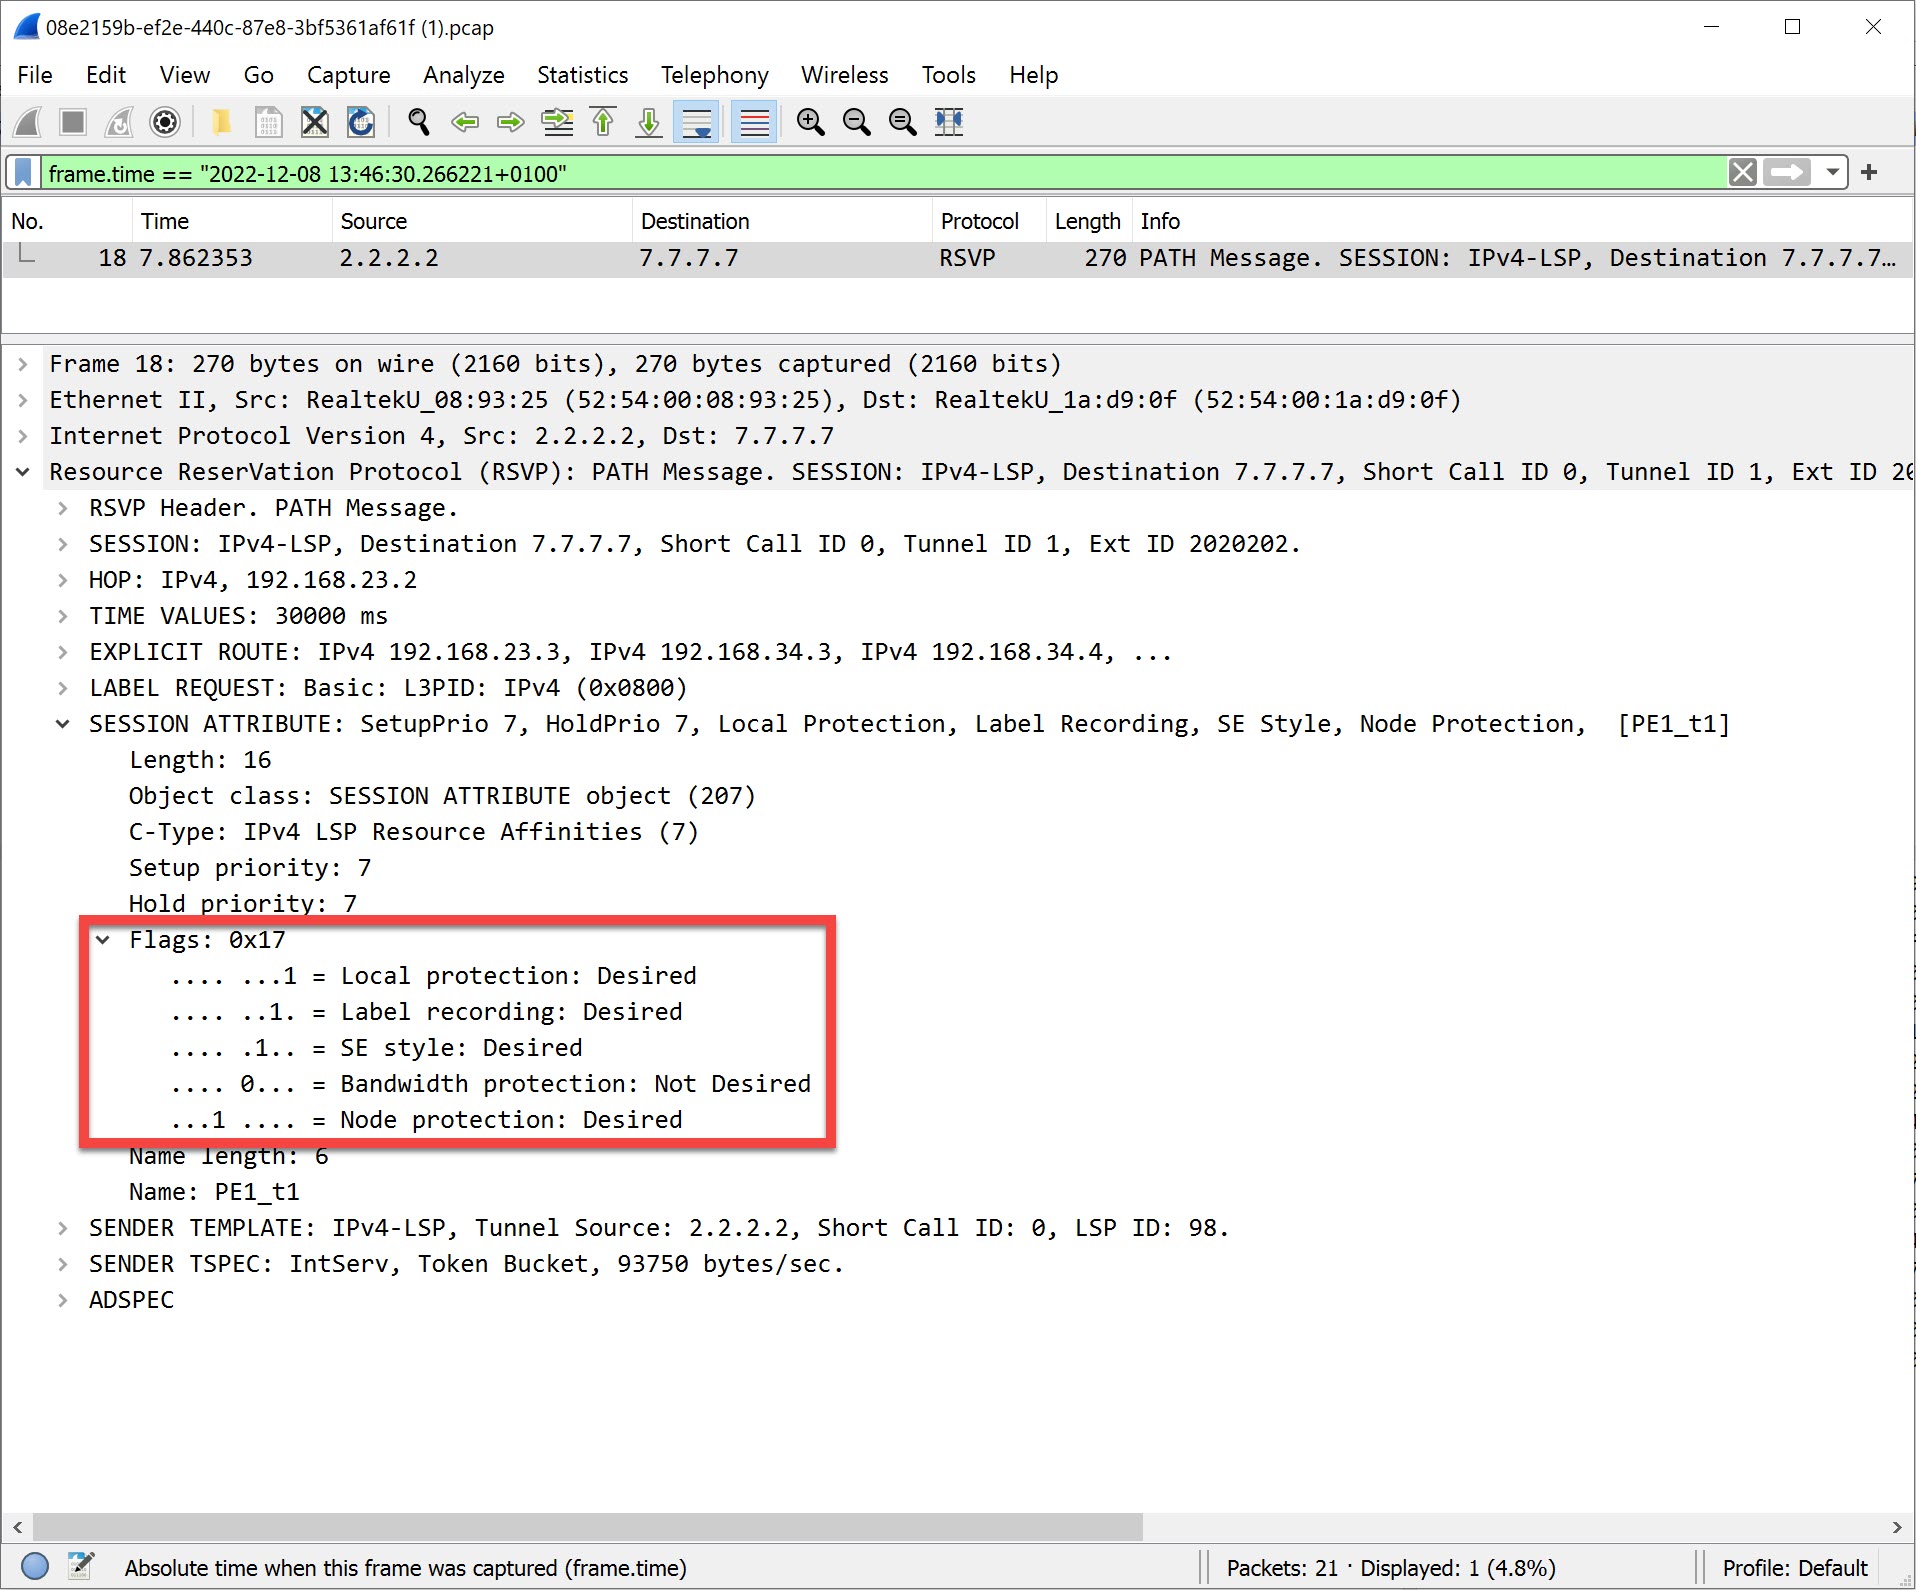
MPLS TE FRR RSVP Node Protection Desired
You can now see that PE1 desires node protection for its tunnel. When you enable node protection, you also have link protection.
P1
Let’s configure P1. Our backup tunnel should never use P2. This means the backup tunnel should go from P1 to P3 and terminate at P4. To accomplish this, I’ll configure an explicit path that excludes P2:
P1(config)#ip explicit-path name EXCLUDE_P2
P1(cfg-ip-expl-path)# exclude-address 4.4.4.4- Unit 1: Introduction
- Unit 2: LDP (Label Distribution Protocol)
- Unit 3: MPLS VPN
- VRFs (Virtual Routing and Forwarding)
- MPLS L3 VPN Explained
- MPLS L3 VPN Configuration
- MPLS L3 VPN BGP Allow AS in
- MPLS L3 VPN BGP AS Override
- MPLS L3 VPN PE-CE RIP
- MPLS L3 VPN PE-CE EIGRP
- MPLS L3 VPN PE-CE OSPF
- MPLS L3 VPN PE-CE OSPF Default Route
- MPLS L3 VPN PE-CE OSPF Global Default Route
- MPLS L3 VPN PE-CE OSPF Sham Link
- VRF Lite Route Leaking
- MPLS VPN Extranet Route Leaking
- MPLS VPN VRF Export Map
- MPLS VPN VRF Import Map
- MPLS over FlexVPN
- Unit 4: MPLS L2 Encapsulation
- Unit 5: IPv6 MPLS
- Unit 6: MPLS Traffic Engineering (TE)
- Introduction to MPLS Traffic Engineering (TE)
- MPLS Traffic Engineering (TE) IS-IS Configuration
- MPLS Traffic Engineering (TE) OSPF Configuration
- MPLS TE RSVP-TE
- MPLS TE Static Routes
- MPLS TE Policy Based Routing (PBR)
- MPLS TE Autoroute Announce
- MPLS TE Autoroute Destination
- MPLS TE Autoroute Metric
- MPLS TE Unequal Cost Load Balancing
- MPLS TE Load Balancing between IGP and TE
- MPLS TE Forwarding Adjacency
- MPLS TE Path Options Explicit
- MPLS TE Class-Based Tunnel Selection (CBTS)
- MPLS TE Metric
- MPLS TE Setup and Hold Priority
- MPLS TE Attribute Flag and Affinity
- MPLS TE Reoptimization
- MPLS TE Fast Reroute (FRR)
- MPLS TE Fast Reroute Path Link Protection
- MPLS TE Fast Reroute Path Node Protection
- MPLS TE FRR RSVP Hello Support
- MPLS TE DiffServ Aware (DS-TE) Traditional
- MPLS TE Diffserv-Aware (DS-TE) IETF Mode
- MPLS VPN over MPLS TE Tunnels
- MPLS TE Per VRF TE tunnel