OSPF uses hello packets and two timers to check if a neighbor is still alive or not:
- Hello interval: this defines how often we send the hello packet.
- Dead interval: this defines how long we should wait for hello packets before we declare the neighbor dead.
The hello and dead interval values can be different depending on the OSPF network type. On Ethernet interfaces you will see a 10 second hello interval and a 40 second dead interval.
Let’s take a look at an example so we can see this in action. Here’s the topology I will use:
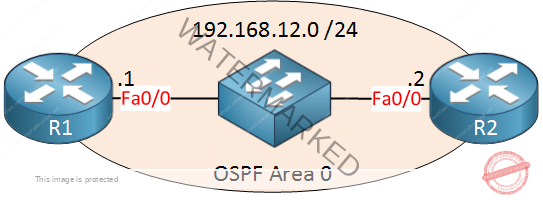
We’ll use two routers with a switch in between.
Configuration
Let’s enable OSPF:
R1 & R2#
(config)#router ospf 1
(config-router)#network 192.168.12.0 0.0.0.255 area 0
Let’s take a look at the default hello and dead interval:
R1#show ip ospf interface FastEthernet 0/0 | include intervals
  Timer intervals configured, Hello 10, Dead 40, Wait 40, Retransmit 5
The hello and dead interval can be different for each interface. Above you can see that the hello interval is 10 seconds and the dead interval is 40 seconds. Let’s try if this is true:
R1(config)#interface FastEthernet 0/0
R1(config-if)#shutdown
After shutting the interface on R1 you will see the following message:
R1#
Aug 30 17:57:05.519: %OSPF-5-ADJCHG: Process 1, Nbr 192.168.12.2 on FastEthernet0/0 from FULL to DOWN, Neighbor Down: Interface down or detached
R1 will know that R2 is unreachable since its interface went down. Now take a look at R2:
R2#
Aug 30 17:57:40.863: %OSPF-5-ADJCHG: Process 1, Nbr 192.168.12.1 on FastEthernet0/0 from FULL to DOWN, Neighbor Down: Dead timer expired
R2 is telling us that the dead timer has expired. This took a bit longer. The interface on R1 went down at 17:57:05 and R2’s dead timer expired at 17:57:40…that’s close to 40 seconds.
Let’s activate the interface again:
R1(config)#interface FastEthernet 0/0
R1(config-if)#no shutdown
40 seconds is a long time…R2 will keep sending traffic to R1 while the dead interval is expiring. To speed up this process we can play with the timers. Here’s an example:
R1 & R2
(config)#interface FastEthernet 0/0
(config-if)#ip ospf hello-interval 1
(config-if)#ip ospf dead-interval 3
You can use these two commands to change the hello and dead interval. We’ll send a hello packet every second and the dead interval is 3 seconds. Let’s verify this:
R1#show ip ospf interface FastEthernet 0/0 | include intervals
  Timer intervals configured, Hello 1, Dead 3, Wait 3, Retransmit 5
Reducing the dead interval from 40 to 3 seconds is a big improvement but we can do even better:
R1(config-if)#ip ospf dead-interval ?
  <1-65535>  Seconds
  minimal    Set to 1 second
We can reduce the dead interval to 1 second. If you use the ip ospf dead-interval minimal command then you have to specify the number of hellos sent in one second:
R1(config-if)#ip ospf dead-interval minimal hello-multiplier ?
  <3-20>  Number of Hellos sent within 1 second
Let’s change it to 3 hello packets:
R1 & R2
(config-if)#ip ospf dead-interval minimal hello-multiplier 3
We now have superfast hello packets. Take a look below:
R1#show ip ospf interface FastEthernet 0/0 | include intervals
  Timer intervals configured, Hello 333 msec, Dead 1, Wait 1, Retransmit 5
Each 333 msec we will send a hello packet, if we don’t receive any within a second then we will declare the neighbor dead.
Our routers will now react quickly when they don’t receive a hello packet in time.
It’s possible to reduce failover times even more using something called Bidirectional Forwarding Detection (BFD). This is a protocol that runs independent from routing protocols and is used to detect link failures between two endpoints. It’s used often on links that don’t offer any failure detection (like Ethernet). We will cover this in another lesson.
Unit 1: Introduction to OSPF
- Introduction to OSPF
- Basic OSPF Configuration
- OSPF Multi Area Configuration
- OSPF Reference Bandwidth
- OSPF Plain Text Authentication
- OSPF MD5 Authentication
- OSPF SHA-HMAC Authentication
- OSPF TTL Security Check
- OSPF Default Route
Unit 2: OSPF Neighbor Adjacency
- OSPF LSA Types
- OSPF LSAs and LSDB Flooding
- OSPF Hello and Dead Interval
- OSPF Router ID
- OSPF Packets and Neighbor Discovery
- OSPF DR/BDR Election
- OSPF Passive Interface
- Troubleshooting OSPF Neighbor Adjacency
Unit 3: OSPF Network Types
- OSPF Non-Broadcast Network Type
- OSPF Broadcast Network Type
- OSPF Point-to-Multipoint Network Type
- OSPF Point-to-Multipoint Non-Broadcast Network Type
- OSPF Point-to-Point Network Type
- OSPF Next Hop with Network Types
Unit 4: OSPF Stub Areas
- Introduction to OSPF Stub Areas
- How to configure OSPF Stub Area
- How to configure OSPF Totally Stub
- How to configure OSPF NSSA (Not So Stubby) Area
- How to configure OSPF Totally NSSA (Not So Stubby) Area
- OSPF NSSA P-bit explained
Unit 5: Advanced OSPF Topics
- OSPF Summarization
- OSPF Distribute-List Filtering
- OSPF LSA Type 3 Filtering
- OSPF LSA Type 5 Filtering
- OSPF Virtual Link
- OSPF Virtual Link Authentication
- OSPF Path Selection Explained
- How to read the OSPF Database
- OSPFv3 for IPv4
- Troubleshooting OSPF Route Advertisement
- OSPF SPF Scheduling and Throttling
- OSPF LSA Throttling
- OSPF Incremental SPF
- OSPF Prefix Suppression
- OSPF Stub Router
- OSPF Graceful Shutdown
- OSPF Graceful Restart
- OSPF Loop-Free Alternate (LFA) Fast Reroute (FRR)
- OSPF Remote Loop-Free Alternate (LFA) Fast Reroute (FRR)