Basic OSPF Configuration
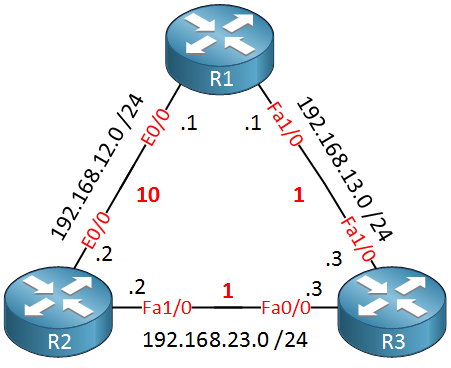
CCNA students need to understand how OSPF works but also how to configure it. If you have no idea what OSPF is or if you are a little fuzzy, I recommend you to read my Introduction to OSPF first before continuing. Having said that, let’s configure OSPF! This is the topology I will use:
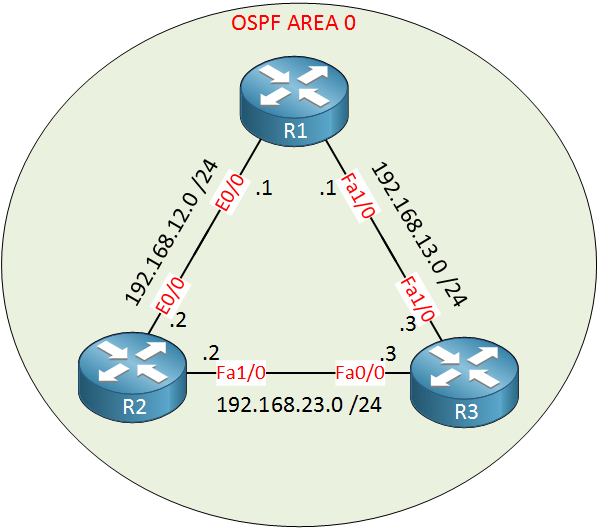
This is the topology that we’ll use. All routers are in OSPF Area 0. Note that the link between R2 and R1 is an Ethernet (10Mbit) link. All other links are FastEthernet (100Mbit) interfaces.
We’ll start with the configuration between R2 and R3:
R2(config)#router ospf 1
R2(config-router)#network 192.168.23.0 0.0.0.255 area 0R3(config)#router ospf 1
R3(config-router)#network 192.168.23.0 0.0.0.255 area 0I need to use the router ospf command to get into the OSPF configuration. The number “1” is a process ID and you can choose any number you like. It doesn’t matter and if you want you can use a different number on each router.
The second step is to use the network command. It works similar to RIP but it is slightly different, let me break it down for you:
network 192.168.23.0 0.0.0.255Just like RIP the network command does two things:
- Advertise the networks that fall within this range in OSPF.
- Activate OSPF on the interface(s) that fall within this range. This means that OSPF will send hello packets on the interface.
Behind 192.168.23.0 you can see it says 0.0.0.255. This is not a subnet mask but a wildcard mask. A wildcard mask is a reverse subnet mask. Let me give you an example:
| Subnetmask | 255 | 255 | 255 | 0 |
| 11111111 | 11111111 | 11111111 | 00000000 | |
| Wildcardmask | 0 | 0 | 0 | 255 |
| 00000000 | 00000000 | 00000000 | 11111111 |
When I say reverse subnet mask I mean that the binary 1s and 0s of the wildcard mask are flipped compared to the subnet mask. A subnet mask of 255.255.255.0 is the same as wildcard mask 0.0.0.255. Don’t worry about this too much for now as I’ll explain wildcard masks to you when we talk about access-lists!
OSPF uses areas so you need to specify the area:
area 0In our example we have configured single area OSPF. All routers belong to area 0.
After typing in my network command you’ll see this message in the console:
R3# %OSPF-5-ADJCHG: Process 1, Nbr 192.168.23.2 on FastEthernet0/0 from LOADING to FULL, Loading DoneR2# %OSPF-5-ADJCHG: Process 1, Nbr 192.168.23.3 on FastEthernet1/0 from LOADING to FULL, Loading DoneGreat! It seems that R3 and R2 have become neighbors. There’s another command we can use to verify that we have become neighbors:
R3#show ip ospf neighbor

Neighbor ID Pri State Dead Time Address Interface
192.168.23.2 1 FULL/BDR 00:00:36 192.168.23.2 FastEthernet0/0
R2#show ip ospf neighbor
Neighbor ID Pri State Dead Time Address Interface
192.168.23.3 1 FULL/DR 00:00:32 192.168.23.3 FastEthernet1/0Show ip ospf neighbor is a great command to see if your router has OSPF neighbors. When the state is full you know that the routers have successfully become neighbors.
Each OSPF router has a router ID and we check it with the show ip protocols command:
R2#show ip protocols
Routing Protocol is "ospf 1"
Outgoing update filter list for all interfaces is not set
Incoming update filter list for all interfaces is not set
Router ID 192.168.23.2R3#show ip protocols
Routing Protocol is "ospf 1"
Outgoing update filter list for all interfaces is not set
Incoming update filter list for all interfaces is not set
Router ID 192.168.23.3Above you see the router ID of R2 and R3. They used their highest active IP address as the router ID. Let’s create a loopback on R2 to see if the router ID changes…
R2(config)#interface loopback 0
R2(config-if)#ip address 2.2.2.2 255.255.255.0This is how you create a loopback interface. You can pick any number that you like it really doesn’t matter.
R2#show ip protocols
Routing Protocol is "ospf 1"
Outgoing update filter list for all interfaces is not set
Incoming update filter list for all interfaces is not set
Router ID 192.168.23.2The router ID still the same. We need to reset the OSPF process before the change will take effect, this is how you do it:
R2#clear ip ospf process
Reset ALL OSPF processes? [no]: yesUse clear ip ospf process to reset OSPF. Let’s see if there is a difference:
R2#show ip protocols
Routing Protocol is "ospf 1"
Outgoing update filter list for all interfaces is not set
Incoming update filter list for all interfaces is not set
Router ID 2.2.2.2We can also change the router ID manually. Let me demonstrate this on R3:
R3#show ip protocols
Routing Protocol is "ospf 1"
Outgoing update filter list for all interfaces is not set
Incoming update filter list for all interfaces is not set
Router ID 192.168.23.3Right now it’s 192.168.23.3…
R3(config-router)#router-id 3.3.3.3
Reload or use "clear ip ospf process" command, for this to take effectR3#clear ip ospf process
Reset ALL OSPF processes? [no]: yesThe router is friendly enough to warn me to reload or clear the OSPF process. Let’s verify our configuration:
R3#show ip protocols
Routing Protocol is "ospf 1"
Outgoing update filter list for all interfaces is not set
Incoming update filter list for all interfaces is not set
Router ID 3.3.3.3
As you can see above the router ID is now 3.3.3.3.
Changing the router ID isn’t something you would normally do. IP addresses on your router have to be unique so your OSPF router ID will also be unique. Understanding how OSPF selects a router ID is something you have to understand for the exam however.
Right now we have an OSPF neighbor adjacency between R2 and R3. Let’s configure our routers so that R2/R1 and R1/R3 also become OSPF neighbors:
R2(config)#router ospf 1
R2(config-router)#network 192.168.12.0 0.0.0.255 area 0R1(config)#router ospf 1
R1(config-router)#network 192.168.12.0 0.0.0.255 area 0
R1(config-router)#network 192.168.13.0 0.0.0.255 area 0R3(config)#router ospf 1
R3(config-router)#network 192.168.13.0 0.0.0.255 area 0I’ll advertise all networks in OSPF. Before we check the routing table it’s a good idea to see if our routers have become OSPF neighbors:
R2#show ip ospf neighbor

Neighbor ID   Pri   State     Dead Time   Address       Interface
192.168.13.1    1   FULL/BDR  00:00:31    192.168.12.1  Ethernet0/0
3.3.3.3 1 FULL/DR 00:00:38 192.168.23.3 FastEthernet1/0R1#show ip ospf neighbor
Neighbor ID Pri State Dead Time Address Interface
3.3.3.3 1 FULL/BDR 00:00:33 192.168.13.3 FastEthernet1/0
2.2.2.2 1 FULL/DR 00:00:30 192.168.12.2 Ethernet0/0R3#show ip ospf neighbor
Neighbor ID Pri State Dead Time Address Interface
192.168.13.1 1 FULL/DR 00:00:37 192.168.13.1 FastEthernet1/0
2.2.2.2 1 FULL/BDR 00:00:30 192.168.23.2 FastEthernet0/0Excellent our routers have become OSPF neighbors and the state is full which means they are done exchanging information. Let’s check the routing tables:
R2#show ip route ospf
O    192.168.13.0/24 [110/2] via 192.168.23.3, 00:09:45, FastEthernet1/0
R2 has one entry, it’s for network 192.168.13.0 /24. What exactly do we see here?
- The “O” stands for OSPF. This entry was learned through OSPF.
- 192.168.13.0 /24 is the network that we learned. This is the link between R1 and R3.
- The “110” is the administrative distance of OSPF.
- The “2” is the metric. OSPF uses cost as a metric. To reach this network we have a total cost of 2.
- “via” is the next hop IP address where we send our traffic to. This is R3 for this network.
How did OSPF exactly come up with this cost? Let’s take a detailed look:
R2#show ip ospf interface fa1/0
FastEthernet1/0 is up, line protocol is up
  Internet Address 192.168.23.2/24, Area 0
  Process ID 1, Router ID 2.2.2.2, Network Type BROADCAST, Cost: 1
You can use the show ip ospf interface command to check the cost of a certain interface. As you can see a FastEthernet interface has a cost of 1.
R2#show ip ospf interface e0/0
Ethernet0/0 is up, line protocol is up
  Internet Address 192.168.12.2/24, Area 0
  Process ID 1, Router ID 2.2.2.2, Network Type BROADCAST, Cost: 10
An Ethernet interface is slower and it has a cost of 10. Let’s draw a picture to illustrate this:
In the picture above I have added the cost of the interface. From R2 I can reach network 192.168.13.0 /24 by going through R3 or R1. This is what the cost will be:
- Through R3: 1+1 = cost 2.
- Through R1: 10+1 = cost 11.
Obviously the path through R3 has the lowest cost. As an experiment we can shut the FastEthernet0/0 interface on R3 to see if R2 can find another path:
R3(config)#interface fastEthernet 0/0
R3(config-if)#shutdown
R2#show ip route ospf
O    192.168.13.0/24 [110/11] via 192.168.12.1, 00:01:20, Ethernet0/0
Now you can see that R2 will reach network 192.168.13.0 /24 through R1 and it has a total cost of 11. Before we continue let’s enable the interface again:
R3(config)#interface fastEthernet 0/0
R3(config-if)#no shutdown
Let’s verify our routing table:
R2#show ip route ospf
O    192.168.13.0/24 [110/2] via 192.168.23.3, 00:00:01, FastEthernet1/0
Now it’s using the FastEthernet1/0 interface again. What if I wanted to force OSPF to use the slower Ethernet0/0 interface without shutting the FastEthernet interface? It’s possible to manually change the cost, let me show you how:
R2(config)#interface fastEthernet 1/0
R2(config-if)#ip ospf cost 50
Use the ip ospf cost command to change the cost. When I set it to 50 the FastEthernet interface isn’t attractive anymore.
R2#show ip ospf interface fastEthernet 1/0
FastEthernet1/0 is up, line protocol is up
  Internet Address 192.168.23.2/24, Area 0
  Process ID 1, Router ID 2.2.2.2, Network Type BROADCAST, Cost: 50
I can verify that the cost is now 50.
R2#show ip route ospf
O    192.168.13.0/24 [110/11] via 192.168.12.1, 00:01:20, Ethernet0/0
And as a result OSPF will prefer the slower Ethernet interface…
Let’s get rid of this cost command and take a look at the other routing tables!
R2(config)#interface fastEthernet 1/0
R2(config-if)#no ip ospf cost 50R1#show ip route ospf
O 192.168.23.0/24 [110/2] via 192.168.13.3, 00:00:15, FastEthernet1/0R1 has a single entry for the 192.168.23.0 /24 network through R3. This is the shortest path and it has a cost of 2.
R3#show ip route ospf
O    192.168.12.0/24 [110/11] via 192.168.23.2, 00:01:14, FastEthernet0/0
                     [110/11] via 192.168.13.1, 00:01:14, FastEthernet1/0
R3 has two interesting entries. It has learned about the 192.168.12.0 /24 network and it can reach it through 192.168.23.2 (R2) or through 192.168.13.1 (R1). The cost of both paths is 11. OSPF will do load-balancing to reach this network.
Do you remember our loopback0 interface on R2? We used it for the router ID but we can also advertise it in OSPF or any other routing protocol, let me show you:
R2#show ip interface loopback 0
Loopback0 is up, line protocol is up
  Internet address is 2.2.2.2/24
As you can see it’s a normal interface with an IP address and subnet mask on it. Let’s advertise it:
R2(config)#router ospf 1
R2(config-router)#network 2.2.2.0 0.0.0.255 area 0
I’ll use the above network command to advertise it into OSPF. Let’s check the routing tables:
R1#show ip route ospf
     2.0.0.0/32 is subnetted, 1 subnets
O       2.2.2.2 [110/3] via 192.168.13.3, 00:00:26, FastEthernet1/0
O    192.168.23.0/24 [110/2] via 192.168.13.3, 00:00:26, FastEthernet1/0
R1 will reach it by going through R3. The total cost is 3:
1 (FastEthernet) + 1 (FastEthernet) + 1 (Loopback) = 3.
R3#show ip route ospf
O    192.168.12.0/24 [110/11] via 192.168.23.2, 00:01:42, FastEthernet0/0
                     [110/11] via 192.168.13.1, 00:01:42, FastEthernet1/0
     2.0.0.0/32 is subnetted, 1 subnets
O       2.2.2.2 [110/2] via 192.168.23.2, 00:01:42, FastEthernet0/0
R3 has a total cost of 2:
1 (FastEthernet) + 1 (Loopback) = 2.
The great thing about loopback interfaces is that they are reachable just like normal interfaces:
R3#ping 2.2.2.2

Type escape sequence to abort.
Sending 5, 100-byte ICMP Echos to 2.2.2.2, timeout is 2 seconds:
!!!!!
Success rate is 100 percent (5/5), round-trip min/avg/max = 4/4/8 ms
You can ping them just like any other interface.
Loopback interfaces have many more uses but for CCNA it’s great to use them to quickly advertise networks into your routing protocols.
We can also advertise a default route into OSPF. This might be useful if your router is connected to the Internet and you want to advertise this to other routers, this is how you do it:
R2(config)#router ospf 1
R2(config-router)#default-information originate always
You need to use the default-information originate command. If you don’t already have a default route in your routing table then you need to add the always keyword.
Let’s see if the default route has been advertised:
R1#show ip route ospf
     2.0.0.0/32 is subnetted, 1 subnets
O       2.2.2.2 [110/3] via 192.168.13.3, 00:00:50, FastEthernet1/0
O    192.168.23.0/24 [110/2] via 192.168.13.3, 00:00:50, FastEthernet1/0
O*E2 0.0.0.0/0 [110/1] via 192.168.13.3, 00:00:50, FastEthernet1/0R3#show ip route ospf
O 192.168.12.0/24 [110/11] via 192.168.23.2, 00:00:45, FastEthernet0/0
[110/11] via 192.168.13.1, 00:00:45, FastEthernet1/0
2.0.0.0/32 is subnetted, 1 subnets
O 2.2.2.2 [110/2] via 192.168.23.2, 00:00:45, FastEthernet0/0
O*E2 0.0.0.0/0 [110/1] via 192.168.23.2, 00:00:45, FastEthernet0/0As you can see R1 and R3 have learned the default route from R2.
Let’s continue our OSPF configuration. I want to show you how to do plaintext and MD5 authentication. I’ll start by configuring plaintext authentication between R2 and R3:
R2(config)#interface fastEthernet 1/0
R2(config-if)#ip ospf authentication
R2(config-if)#ip ospf authentication-key MY_SECRETR3(config)#interface fastEthernet 0/0
R3(config-if)#ip ospf authentication
R3(config-if)#ip ospf authentication-key MY_SECRETFirst you need to use the ip ospf authentication command to enable plaintext authentication on the interface. Secondly we need to configure a password using the ip ospf authentication-key command.
Once you configure authentication on one router you’ll see the neighbor adjacency going down for a moment until you configure the other router.
There is a useful debug command you can use to verify if authentication has been enabled or not:
R3#debug ip ospf packet
OSPF packet debugging is on
Debug ip ospf packet will show you an overview of the OSPF packets that you are receiving, it looks like this:
R3#
OSPF: rcv. v:2 t:1 l:48 rid:192.168.13.1
      aid:0.0.0.0 chk:7D95 aut:0 auk: from FastEthernet1/0
This is a packet that we received from R1. The “aut:0” means that this packet is not authenticated. This is correct because we didn’t configure authentication between R3 and R1.
OSPF: rcv. v:2 t:1 l:48 rid:2.2.2.2
      aid:0.0.0.0 chk:3339 aut:1 auk: from FastEthernet0/0
This packet is from R2 and you can see it says “aut:1”. This means we have enabled plaintext authentication. Let’s disable debug before we continue:
R3#no debug all
All possible debugging has been turned off
Let’s configure MD5 authentication between R1 and R3:
R3(config)#interface fastEthernet 1/0
R3(config-if)#ip ospf authentication message-digest
R3(config-if)#ip ospf message-digest-key 1 md5 mykeyR1(config)#interface fastEthernet 1/0
R1(config-if)#ip ospf authentication message-digest
R1(config-if)#ip ospf message-digest-key 1 md5 mykeyFirst we tell OSPF to use MD5 with the ip ospf authentication message-digest command. Secondly the ip ospf message-digest-key tells OSPF to use MD5 key 1 (you can pick any number you like as long it’s the same on both routers) and password “mykey”.
If you enable the debug you can see that it’s working:
R1#debug ip ospf packet
OSPF packet debugging is on
R1#
OSPF: rcv. v:2 t:1 l:48 rid:3.3.3.3
aid:0.0.0.0 chk:0 aut:2 keyid:1 seq:0x3C7EE6DC from FastEthernet1/0R1#no debug all
All possible debugging has been turned offIn the output above you can see it says “auth:2” which means MD5 authentication. You can also see the key-id.
In the examples above I enabled authentication per interface. It’s also possible to do this for the entire area…this might save you some time if you have a router with many interfaces. You can do it like this:
R3(config-if)#router ospf 1
R3(config-router)#area 0 authentication
Or in case you want MD5 authentication:
R3(config-if)#router ospf 1
R3(config-router)#area 0 authentication message-digest
If you want you can change the OSPF timers so it responds faster to changes in the network. This is how you do it:
R1#show ip ospf interface fastEthernet 1/0
FastEthernet1/0 is up, line protocol is up
  Internet Address 192.168.13.1/24, Area 0
  Process ID 1, Router ID 192.168.13.1, Network Type BROADCAST, Cost: 1
  Transmit Delay is 1 sec, State DR, Priority 1
  Designated Router (ID) 192.168.13.1, Interface address 192.168.13.1
  Backup Designated router (ID) 3.3.3.3, Interface address 192.168.13.3
  Timer intervals configured, Hello 10, Dead 40, Wait 40, Retransmit 5
Above you see the default timers. Every 10 seconds an hello packet is sent and if we don’t receive any hello packets for 40 seconds then we will declare our neighbor “dead”.
If we want we can change these tuners, I’ll do this between R2 and R3:
R2(config-if)#interface fastEthernet 1/0
R2(config-if)#ip ospf hello-interval 5
R2(config-if)#ip ospf dead-interval 15R3(config)#interface fastEthernet 0/0
R3(config-if)#ip ospf hello-interval 5
R3(config-if)#ip ospf dead-interval 15Use the ip ospf hello-interval and ip ospf dead-interval to change these timers. As I explained in the beginning of this lesson, these values have to match on both ends! This is all I wanted to show you.
- Configurations
- R3
- R1
- R2
Unit 1: Introduction to OSPF
- Introduction to OSPF
- Basic OSPF Configuration
- OSPF Multi Area Configuration
- OSPF Reference Bandwidth
- OSPF Plain Text Authentication
- OSPF MD5 Authentication
- OSPF SHA-HMAC Authentication
- OSPF TTL Security Check
- OSPF Default Route
Unit 2: OSPF Neighbor Adjacency
- OSPF LSA Types
- OSPF LSAs and LSDB Flooding
- OSPF Hello and Dead Interval
- OSPF Router ID
- OSPF Packets and Neighbor Discovery
- OSPF DR/BDR Election
- OSPF Passive Interface
- Troubleshooting OSPF Neighbor Adjacency
Unit 3: OSPF Network Types
- OSPF Non-Broadcast Network Type
- OSPF Broadcast Network Type
- OSPF Point-to-Multipoint Network Type
- OSPF Point-to-Multipoint Non-Broadcast Network Type
- OSPF Point-to-Point Network Type
- OSPF Next Hop with Network Types
Unit 4: OSPF Stub Areas
- Introduction to OSPF Stub Areas
- How to configure OSPF Stub Area
- How to configure OSPF Totally Stub
- How to configure OSPF NSSA (Not So Stubby) Area
- How to configure OSPF Totally NSSA (Not So Stubby) Area
- OSPF NSSA P-bit explained
Unit 5: Advanced OSPF Topics
- OSPF Summarization
- OSPF Distribute-List Filtering
- OSPF LSA Type 3 Filtering
- OSPF LSA Type 5 Filtering
- OSPF Virtual Link
- OSPF Virtual Link Authentication
- OSPF Path Selection Explained
- How to read the OSPF Database
- OSPFv3 for IPv4
- Troubleshooting OSPF Route Advertisement
- OSPF SPF Scheduling and Throttling
- OSPF LSA Throttling
- OSPF Incremental SPF
- OSPF Prefix Suppression
- OSPF Stub Router
- OSPF Graceful Shutdown
- OSPF Graceful Restart
- OSPF Loop-Free Alternate (LFA) Fast Reroute (FRR)
- OSPF Remote Loop-Free Alternate (LFA) Fast Reroute (FRR)