LLQ (Low Latency Queuing) is an extension of CBWFQ (Class Based Weighted Fair Queuing) where we add a priority queue to the scheduler. Here’s an illustration to help you visualize this:
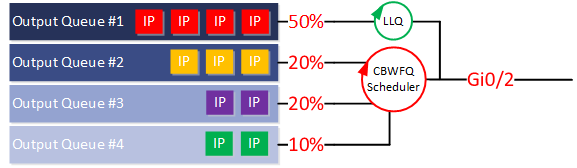
In the picture above, output queue 2,3 and 4 are attached to the regular CBWFQ scheduler and are served in a (weighted) round robin fashion. Queue 1 however, is attached to the LLQ scheduler and bypasses the CBWFQ scheduler. This turns queue 1 into a priority queue. Everything that ends up in queue 1 will be served before any other the other queues.
Configuration
To demonstrate this, I will use the following topology:
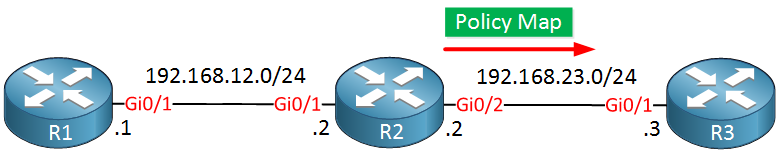
All we need are three routers to demonstrate LLQ. R1 will send some packets to R3, R2 in the middle will do the queuing.
- Configurations
- R1
- R2
- R3
Want to take a look for yourself? Here you will find the startup configuration of each device.
First, we need a class-map to classify the traffic that you want to put in the priority queue. I will create two class-maps. One for VOICE traffic (marked with DSCP ef) and another one for CALL_SIGNALING that is marked with cs3. The voice traffic will end up in the priority queue, the call signaling traffic will be served by CBWFQ.
R2(config)#class-map VOICE
R2(config-cmap)#match dscp ef

R2(config)#class-map CALL_SIGNALING
R2(config-cmap)#match dscp cs3
Now we can create a policy-map and create a priority queue for the voice class-map:
R2(config)#policy-map LLQ
R2(config-pmap)#class VOICER2(config-pmap-c)#priority ?
<1-2000000> Kilo Bits per second
level Multi-Level Priority Queue
percent % of total bandwidth
<cr>Depending on your hardware, you might have two or three options. You can configure a priority queue for a certain kilobit per second rate or a percentage of the bandwidth. The third option on my router is the multi-level priority queue. Most routers will only allow one priority queue, but in this case, I can create two priority queues (high and low). This can be useful if, for example, you have real-time voice and video traffic and you want to prioritize both. With a single priority queue, you can’t decide if voice or video traffic should be prioritized first. Within the priority queue, life is best effort.
With a high and low priority queue, you can ensure that both are prioritized, but one priority queue is still prioritized over the other.
Let’s keep it simple. I will create a priority queue for 2000 Kbps:
R2(config-pmap-c)#priority 2000
R2(config-pmap-c)#exit
For our signaling traffic, we’ll configure a bandwidth guarantee of 1000 Kbps:
R2(config-pmap)#class CALL_SIGNALING
R2(config-pmap-c)#bandwidth 1000
Last but not least, let’s activate the policy map on our interface:
R2(config)#interface GigabitEthernet 0/2
R2(config-if)#service-policy output LLQ
That’s all we have to do…
The Kbps rates that I configured are not hard limits. When there is no congestion on the interface, both classes can get more bandwidth. If you want to enforce a hard limit, you can configure policing for the class.
Verification
Let’s verify our work. Let’s take a look at our class-maps:
R2#show class-map
 Class Map match-all CALL_SIGNALING (id 2)
   Match   dscp cs3 (24)

 Class Map match-any class-default (id 0)
   Match any

 Class Map match-all VOICE (id 1)
   Match   dscp ef (46)
Above, we can see the two class-maps I created. The class-default class is always there. Traffic that is not matched by one of your class-maps will end up in the class-default class. Here’s the policy-map:
R2#show policy-map
  Policy Map LLQ
    Class VOICE
      priority 2000 (kbps)
    Class CALL_SIGNALING
      bandwidth 1000 (kbps)
Let’s generate some traffic and see what happens. I can use some simple pings for this, but I will have to set the ToS byte. The ping command only accepts a ToS parameter in decimal, so I’ll have to do some conversion:
- DSCP EF (46) is 101110 in binary, that’s 184 in decimal.
- DSCP CS3 (24) is 011000 in binary, that’s 96 in decimal.
Let’s send those pings:
R1#ping 192.168.23.3 tos 184 repeat 100
Type escape sequence to abort.
Sending 100, 100-byte ICMP Echos to 192.168.23.3, timeout is 2 seconds:
!!!!!!!!!!!!!!!!!!!!!!!!!!!!!!!!!!!!!!!!!!!!!!!!!!!!!!!!!!!!!!!!!!!!!!
!!!!!!!!!!!!!!!!!!!!!!!!!!!!!!
Success rate is 100 percent (100/100), round-trip min/avg/max = 5/6/11 msR1#ping 192.168.23.3 tos 96 repeat 200
Type escape sequence to abort.
Sending 200, 100-byte ICMP Echos to 192.168.23.3, timeout is 2 seconds:
!!!!!!!!!!!!!!!!!!!!!!!!!!!!!!!!!!!!!!!!!!!!!!!!!!!!!!!!!!!!!!!!!!!!!!
!!!!!!!!!!!!!!!!!!!!!!!!!!!!!!!!!!!!!!!!!!!!!!!!!!!!!!!!!!!!!!!!!!!!!!
!!!!!!!!!!!!!!!!!!!!!!!!!!!!!!!!!!!!!!!!!!!!!!!!!!!!!!!!!!!!
Success rate is 100 percent (200/200), round-trip min/avg/max = 2/6/16 msLet’s see if our traffic matched:
R2#show policy-map interface GigabitEthernet 0/2
 GigabitEthernet0/2

  Service-policy output: LLQ

    queue stats for all priority classes:
      Queueing
      queue limit 64 packets
      (queue depth/total drops/no-buffer drops) 0/0/0
      (pkts output/bytes output) 100/11400

    Class-map: VOICE (match-all)
      100 packets, 11400 bytes
      5 minute offered rate 0000 bps, drop rate 0000 bps
      Match:  dscp ef (46)
      Priority: 2000 kbps, burst bytes 50000, b/w exceed drops: 0


    Class-map: CALL_SIGNALING (match-all)
      200 packets, 22800 bytes
      5 minute offered rate 0000 bps, drop rate 0000 bps
      Match:  dscp cs3 (24)
      Queueing
      queue limit 64 packets
      (queue depth/total drops/no-buffer drops) 0/0/0
      (pkts output/bytes output) 200/22800
      bandwidth 1000 kbps

    Class-map: class-default (match-any)
      7 packets, 724 bytes
      5 minute offered rate 0000 bps, drop rate 0000 bps
      Match: any

      queue limit 64 packets
      (queue depth/total drops/no-buffer drops) 0/0/0
      (pkts output/bytes output) 7/724
There we go, you can see that my packets ended up in the correct queues. Keep in mind that as long as there is no congestion, both classes can get more bandwidth.