When you are configuring QoS on your Cisco switches, you are probably familiar with the concept of “trust boundaries”. If not, take a look at this lesson that I wrote earlier that explains the concept and teaches you how to trust markings or (re)mark packets or Ethernet frames.
Using the mls qos trust command, we can trust the Cos or DSCP value or an IP phone. We can set a new CoS value with the mls qos cos command if we like. The downside of these two commands is that it applies to all packets or Ethernet frames that arrive on the FastEthernet 0/1 interface. What if we wanted to be a bit more specific? Let me show you an example:
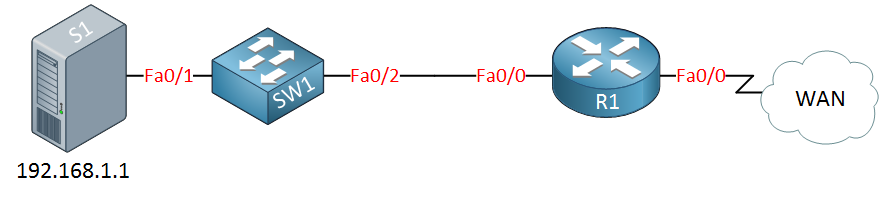
Above, you see a small network with a server, switch, and a router connected to a WAN. Let’s imagine the server is running a couple of applications:
- SSH server.
- Mail server.
- MySQL server.
What if the server cannot mark its IP packets with a DSCP value, but we want to prioritize SSH traffic on the router when it leaves the serial 0/0 interface? In that case, we’ll have to do classification and marking ourselves. I will show you how to do this on a Cisco catalyst switch. You can use a standard, extended, or MAC access-list in combination with MQC (Modular QoS Configuration) to get the job done.
Let’s start with the standard access-list to classify traffic from the server. Since a standard access-list can only match on source IP addresses, I will be unable to differentiate between different applications…
SW1(config)#class-map match-all SERVER
SW1(config-cmap)#match access-group 1
We’ll use a class-map to select our traffic. I will refer to access-list 1 with the match command.
SW1(config)#access-list 1 permit 192.168.1.1
Access-list 1 will match IP address 192.168.1.1. This is the classification part, but we still have to mark our traffic. This is done with a policy-map:
SW1(config)#policy-map SET-DSCP-SERVER
SW1(config-pmap)#class SERVER
SW1(config-pmap-c)#set ip dscp 40
Above, I created a policy map called “SET-DSCP-SERVER” and I’m referring to the class-map “SERVER” that I created before. Using the set command, I will set the DSCP value to 40. Now I am almost done, I still need to activate this policy map on the interface:
SW1(config)#interface FastEthernet 0/1
SW1(config-if)#service-policy input SET-DSCP-SERVER
This is how you activate it on the interface. Use the service-policy command, and you can use the input or output keyword to apply it to inbound or outbound traffic. If you want to verify your configuration and see if traffic is being marked, you can use the following command:
SW1#show policy-map interface FastEthernet 0/1
 FastEthernet0/1

Service-policy input: SET-DSCP-SERVER
 Class-map: SERVER (match-all)
 0 packets, 0 bytes
 5 minute offered rate 0 bps, drop rate 0 bps
 Match: access-group 1

Class-map: class-default (match-any)
 0 packets, 0 bytes
 5 minute offered rate 0 bps, drop rate 0 bps
 Match: any
 0 packets, 0 bytes
 5 minute rate 0 bps
Above, you can see that the policy-map has been applied to the FastEthernet0/1 interface, and even better, you can see the number of packets that have matched this policy-map and class-map. At the moment, there are 0 packets (nothing is connected to my switch at the moment). You can also see the class-default class. All traffic that doesn’t belong to a class-map will belong to the class-default class.
The example above is nice to demonstrate the class-map and policy-map, but I was only able to match the source IP address because of the standard access-list. Let me show you another example that will only match SSH traffic using an extended access-list:
SW1(config)#class-map SSH
SW1(config-cmap)#match access-group 100
First, i’ll create a class-map called SSH that matches access-list 100. Don’t forget to create the access-list:
SW1(config)#access-list 100 permit tcp host 192.168.1.1 eq 22 any
Access-list 100 will match source IP address 192.168.1.1 and source port 22 (SSH). Now we’ll pull it all together with the policy-map:
SW1(config)#policy-map SET-DSCP-SSH
SW1(config-pmap)#class SSH
SW1(config-pmap-c)#set ip dscp cs6
Whenever it matches class-map SSH we will set the DSCP value to CS6. Don’t forget to activate it:
SW1(config)#interface FastEthernet 0/1
SW1(config-if)#no service-policy input SET-DSCP-SERVER
SW1(config-if)#service-policy input SET-DSCP-SSH
You can only have one active policy-map per direction on an interface so first we’ll remove the old one. Let’s take a look if it is active:
SW1#show policy-map interface fastEthernet 0/1
 FastEthernet0/1

Service-policy input: SET-DSCP-SSH

Class-map: SSH (match-all)
 0 packets, 0 bytes
 5 minute offered rate 0 bps, drop rate 0 bps
 Match: access-group 100

Class-map: class-default (match-any)
 0 packets, 0 bytes
 5 minute offered rate 0 bps, drop rate 0 bps
 Match: any
 0 packets, 0 bytes
 5 minute rate 0 bps
You can see that it’s active. I still don’t have any traffic so we are stuck at 0 packets 🙂 Using an extended access-list is a nice and clean method to classify traffic. Last but not least let me show you the MAC address access-list. I don’t think it’s very useful but it’s an option:
SW1(config)#class-map SERVER-MAC
SW1(config-cmap)#match access-group name MAC
We’ll create a class-map called SERVER-MAC and refer to an access-list called MAC. Let’s create that MAC access-list:
SW1(config)#mac access-list extended MAC
 SW1(config-ext-macl)#permit host 1234.1234.1234 any
In my example the server has MAC address 1234.1234.1234. Now we’ll create a policy-map and activate it:
SW1(config)#policy-map SET-DSCP-FOR-MAC
SW1(config-pmap)#class SERVER-MAC
SW1(config-pmap-c)#set ip dscp cs1
SW1(config)#interface FastEthernet 0/1
SW1(config-if)#no service-policy input SET-DSCP-SSH
SW1(config-if)#service-policy input SET-DSCP-FOR-MAC
That’s all there is to it. This is what it looks like:
SW1#show policy-map interface fastEthernet 0/1
 FastEthernet0/1

 Service-policy input: SET-DSCP-FOR-MAC

Class-map: SERVER-MAC (match-all)
 0 packets, 0 bytes
 5 minute offered rate 0 bps, drop rate 0 bps
 Match: access-group name MAC

Class-map: class-default (match-any)
 0 packets, 0 bytes
 5 minute offered rate 0 bps, drop rate 0 bps
 Match: any
 0 packets, 0 bytes
 5 minute rate 0 bps
That’s all there is to it. You have now learned how to configuration classification and marking using MQC on Cisco Catalyst switches. Before I forget, MQC is similar on routers so you can configure the same thing on your router.