Multicast PIM Snooping
In a network where you have a layer two switch connected to multicast routers, all multicast traffic is flooded to all multicast router ports, even if there are no multicast receivers behind a router.
When you enable PIM snooping, the switch will learn which multicast router ports should receive traffic by looking at PIM hello, join, prune, and designated forward election messages.
Don’t confuse PIM snooping with IGMP snooping.
Let’s look at some examples:

.
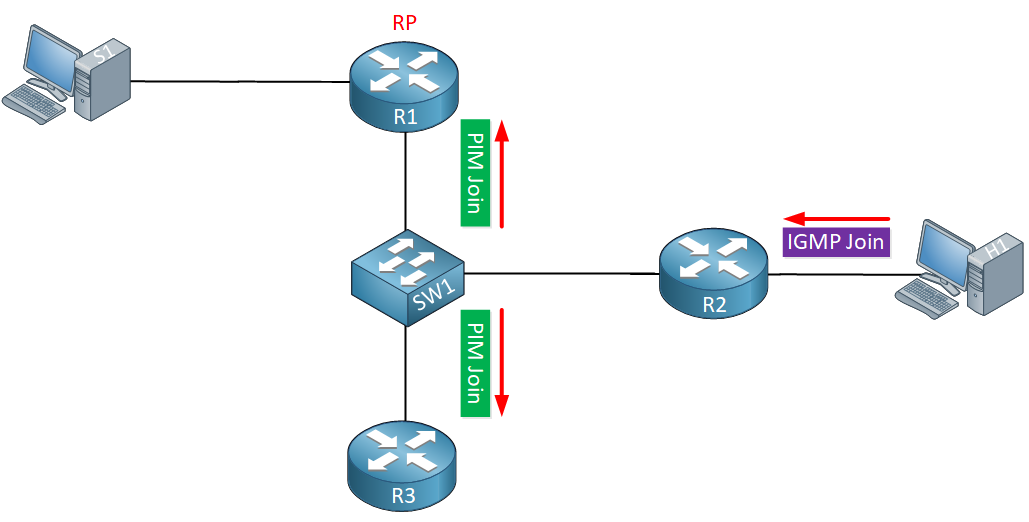
Above we have a small network where SW1 is connected to three multicast routers, R1, R2, and R3. R1 is our RP. Behind R2, we have a receiver that is interested in a multicast group so it sends an IGMP join.
This IGMP join should only be forwarded to the RP (R1) but in reality, it also ends up at R3 since our switch floods all multicast traffic.
What about data traffic?

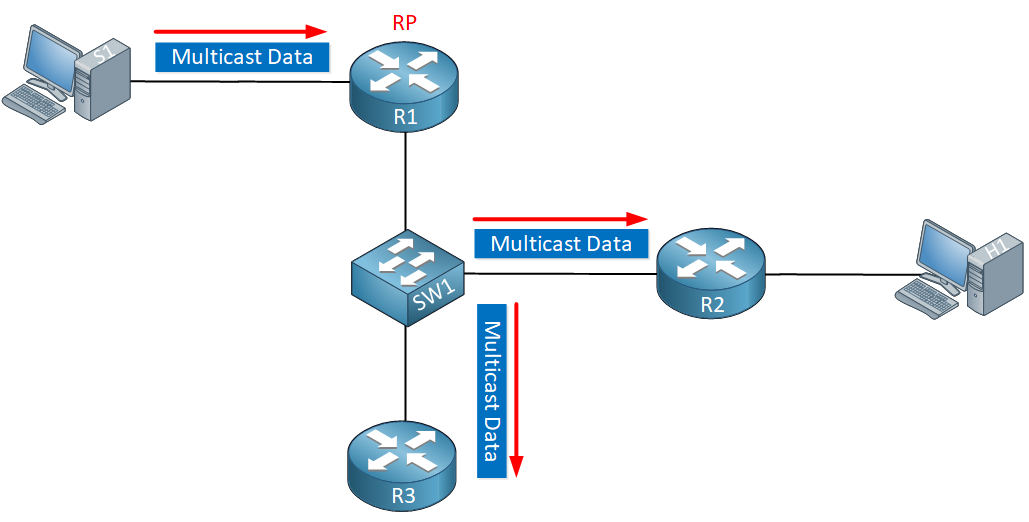
Once our source starts sending multicast traffic, the switch will flood it everywhere so it ends up at R2 (which needs it) but also at R3 that doesn’t have any receivers.
Once we enable PIM snooping, our switch will no longer flood unnecessary PIM join/prune messages nor will it forward multicast traffic to routers that don’t need it.
Some things to keep in mind about PIM snooping:
- PIM dense mode traffic is dropped once you enable PIM snooping.
- Traffic to Auto RP groups (224.0.1.39 and 224.0.1.40) are always flooded.
- PIM snooping and IGMP snooping can be enabled at the same time.
- Multicast router port and router information is timed out based on the hold time that the switch sees in PIM hello, join, and prune packets.
Configuration
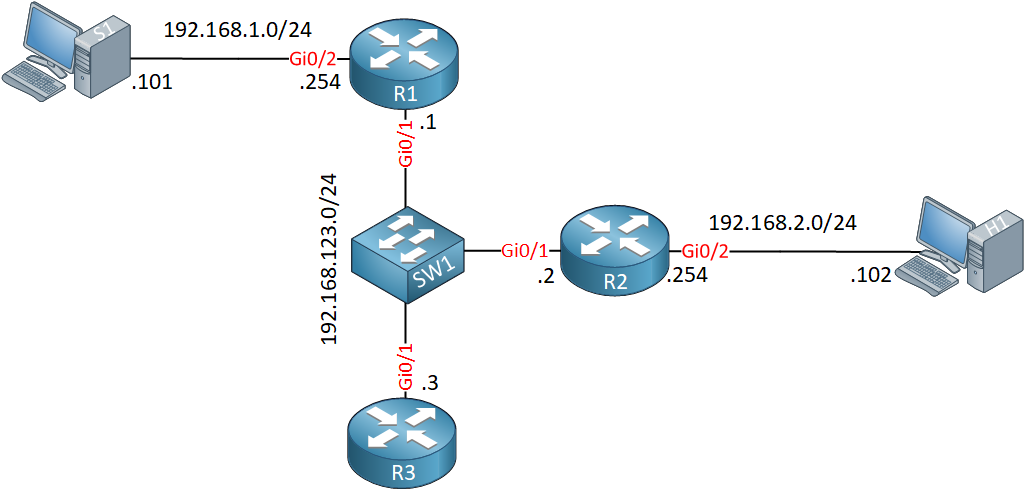
Let’s take a look at this in action. I’ll use the topology I showed you before, but added some interface numbers:

R1, R2, and R3 are multicast routers running PIM sparse mode. R1 is the RP in this network. S1 is our source, H1 is a receiver.
- Configurations
- H1
- R1
- R2
- R3
- S1
Want to take a look for yourself? Here you will find the startup configuration of each device.
PIM Snooping Disabled
PIM snooping is disabled by default. Let’s enable PIM debugging on all routers so we can see what happens behind the scenes:
R1#debug ip pim
PIM debugging is on
Let’s configure H1 to join a multicast group:
H1(config)#interface GigabitEthernet 0/1
H1(config-if)#ip igmp join-group 239.1.1.1
This will trigger some PIM join messages. We can see them here:
R1#
PIM(0): Received v2 Join/Prune on GigabitEthernet0/1 from 192.168.123.2, to us
PIM(0): Join-list: (*, 239.1.1.1), RPT-bit set, WC-bit set, S-bit set
PIM(0): Check RP 1.1.1.1 into the (*, 239.1.1.1) entry
PIM(0): Adding register decap tunnel (Tunnel1) as accepting interface of (*, 239.1.1.1).
PIM(0): Add GigabitEthernet0/1/192.168.123.2 to (*, 239.1.1.1), Forward state, by PIM *G Join
R2#
PIM(0): Check RP 1.1.1.1 into the (*, 239.1.1.1) entry
PIM(0): Building Triggered (*,G) Join / (S,G,RP-bit) Prune message for 239.1.1.1
PIM(0): Upstream mode for (*, 239.1.1.1) changed from 0 to 1
PIM(0): Insert (*,239.1.1.1) join in nbr 192.168.123.1's queue
PIM(0): Building Join/Prune packet for nbr 192.168.123.1
PIM(0): Adding v2 (1.1.1.1/32, 239.1.1.1), WC-bit, RPT-bit, S-bit Join
PIM(0): Send v2 join/prune to 192.168.123.1 (GigabitEthernet0/1)As you can see above, R2 sends a PIM join and R1 receives it, that’s how it is supposed to be.
What about R3?
R3#
PIM(0): Received v2 Join/Prune on GigabitEthernet0/1 from 192.168.123.2, not to us
R3 also receives the PIM join even though it really is not interested in this because there are no receivers behind R3. This happens because the switch floods all PIM packets.
What about multicast data traffic? Let’s find out…I’ll create an access-list that counts traffic to 239.1.1.1:
R3(config-ext-nacl)#ip access-list extended MULTICAST_TRAFFIC
R3(config-ext-nacl)#permit ip any host 239.1.1.1
R3(config-ext-nacl)#permit ip any anyR3(config)#interface GigabitEthernet 0/1
R3(config-if)#ip access-group MULTICAST_TRAFFIC inLet’s send 10 pings from our source to 239.1.1.1:
S1#ping 239.1.1.1 repeat 10
Type escape sequence to abort.
Sending 10, 100-byte ICMP Echos to 239.1.1.1, timeout is 2 seconds:

Reply to request 0 from 192.168.2.102, 12 ms
Reply to request 1 from 192.168.2.102, 12 ms
Reply to request 2 from 192.168.2.102, 11 ms
Reply to request 3 from 192.168.2.102, 16 ms
Reply to request 4 from 192.168.2.102, 16 ms
Reply to request 5 from 192.168.2.102, 15 ms
Reply to request 6 from 192.168.2.102, 10 ms
Reply to request 7 from 192.168.2.102, 14 ms
Reply to request 8 from 192.168.2.102, 17 ms
Reply to request 9 from 192.168.2.102, 10 ms
Now let’s check R3:
R3#show access-lists
Extended IP access list MULTICAST_TRAFFIC
    20 permit ip any host 239.1.1.1 (10 matches)
    30 permit ip any any (63 matches)
Those unnecessary PIM join packets are one thing but flooding multicast data traffic everywhere is another story. That’s something we might want to deal with…
PIM Snooping Enabled
Fortunately, there is a simple command to fix this. We can enable PIM snooping globally or per VLAN. One problem though, this command is only supported on some of the higher end platforms like the Cisco Catalyst 6500 switches.
Globally
You can enable it globally with one command:
SW1(config)#ip pim snoopingAnd use this show command to verify that it’s enabled:
SW1#show ip pim snooping
Global runtime mode: Enabled
Global admin mode : Enabled
Number of user enabled VLANs: 1
User enabled VLANs: 1
Per VLAN
You can also enable it per VLAN:
SW1(config)#interface vlan 1
SW1(config-if)#ip pim snooping
And verify it like this:
SW1#show ip pim snooping vlan 1
3 neighbors (0 DR priority incapable, 0 Bi-dir incapable)
3 mroutes, 3 mac entries
DR is 192.168.123.2
RP DF Set
Designated Router Flooding
There is one last thing we need to talk about. When PIM snooping is enabled, the switch will still flood multicast traffic to the DR (Designated Router).
If you don’t want this, then there is one additional command you need to use:
SW1(config)#no ip pim snooping dr-floodOnce you enable this, the switch only forwards traffic to the DR when it sees a PIM join towards the DR.
Conclusion
You have now learned how switches flood multicast PIM and data traffic to all multicast routers, how to use PIM snooping to prevent this and:
- How to enable PIM snooping globally
- How to enable PIM snooping per VLAN
- How to enable PIM snooping to prevent flooding to the DR (Designated Router)
Table of Content
Unit 1. Introduction to Multicast
Unit 2: IGMP (Internet Group Management Protocol)
- Multicast IGMP Version 1
- Multicast IGMP Version 2
- Multicast IGMP Version 3
- Multicast IGMP Filter
- Multicast IGMP Proxy
Unit 3: Multicast L2
- Multicast IGMP Snooping
- IGMP Snooping without Router
- Multicast CGMP (Cisco Group Management Protocol)
Unit 4: Multicast L3
- Multicast Routing
- Multicast PIM Dense Mode
- Multicast PIM Sparse Mode
- Multicast PIM Sparse-Dense Mode
- Multicast PIM Auto RP
- Multicast PIM BSR (Bootstrap)
- RPF (Reverse Path Forwarding)
- Multicast Tunnel RPF Failure
- PIM Designated Router
- PIM Assert
- Multicast PIM Prune Override
- Multicast PIM Register Message
- Anycast RP
- Multicast MSDP SA Filtering
- Multicast Bidirectional PIM
- Multicast Stub Routing and IGMP Helper
- Source Specific Multicast
- Multicast PIM Accept RP
- Multicast PIM Accept Register
- Multicast Auto-RP Mapping agent behind Spoke
- PIM NBMA Mode
- Multicast Boundary Filtering
- Multicast PIM Snooping