When configuring QoS on our Cisco switches we need to think about our trust boundary. Simply said this basically means on which device are we going to trust the marking of the packets and Ethernet frames entering our network. If you are using IP phones, you can use those for marking and configure the switch to trust the traffic from the IP phone. If you don’t have any IP phones or don’t trust them, we can also configure the switch to do the marking. In this lesson, I’ll show you how to do both! First, let me show you the different QoS trust boundaries:
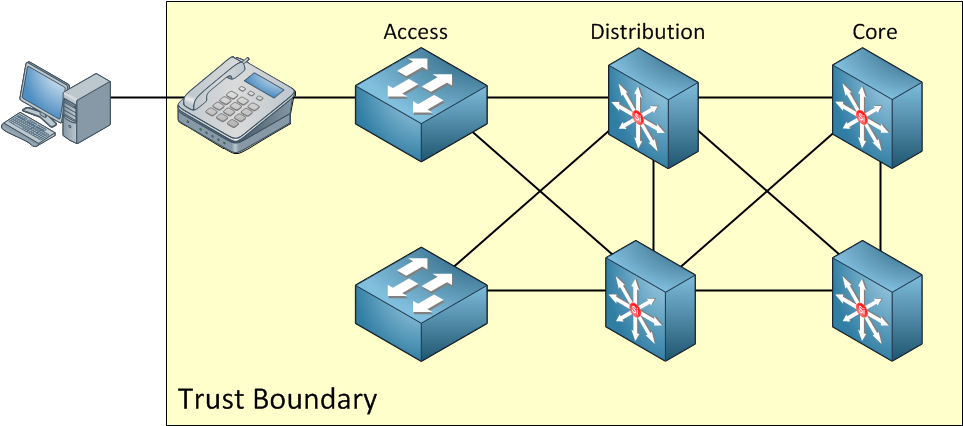
In the picture above the trust boundary is at the Cisco IP phone, this means that we won’t remark any packets or Ethernet frames anymore at the access layer switch. The IP phone will mark all traffic. Note that the computer is outside of the QoS trust boundary. This means that we don’t trust the marking of the computer. We can remark all its traffic on the IP phone if we want. Let’s take a look at another picture:
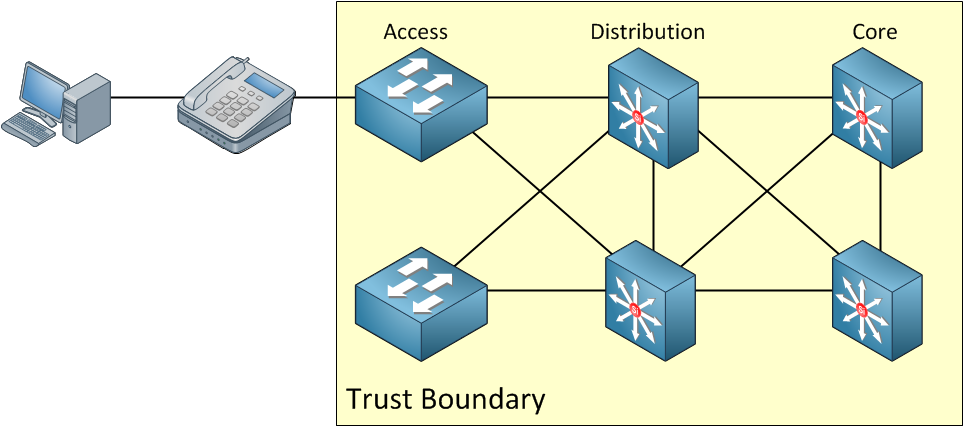
In the picture above, we don’t trust whatever marking the IP phone sends to the access layer switch. This means we’ll do classification and marking on the access layer switches. I have one more example for you…
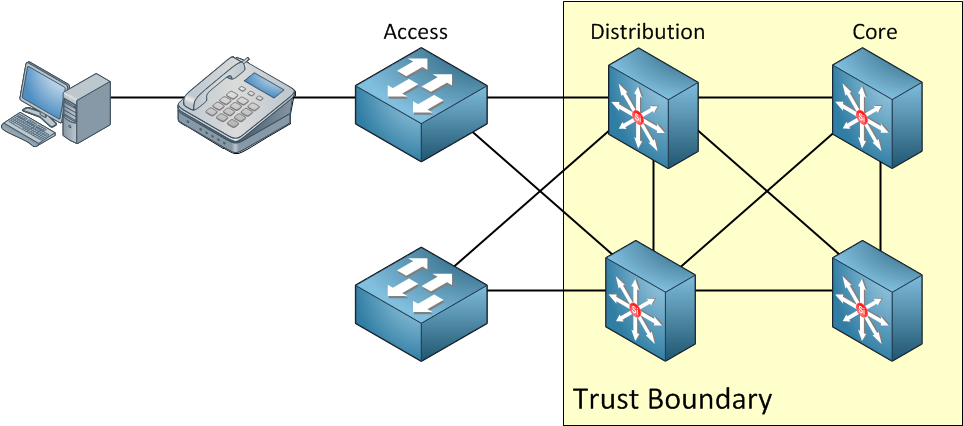
Above you can see that we don’t trust anything before the distribution layer switches. This is something you won’t see very often, but it’s possible if you don’t trust your access layer switches. Maybe someone else does the management for the access layer switches and you want to prevent them to send packets or Ethernet frames that are marked towards your distribution layer switches.
Let’s take a look at a switch to see how we can configure this trust boundary. I have a Cisco Catalyst 3560 that I will use for these examples. Before you do anything with QoS, don’t forget to enable it globally on your switch first:
3560Switch(config)#mls qos
Something you need to be aware of is that as soon as you enable QoS on your switch, it will erase the marking of all packets that are received! If you don’t want this to happen, you can use the following command:
3560Switch(config)#no mls qos rewrite ip dscp
Let’s continue by looking at the first command. We can take a look at the QoS settings for the interface with the show mls qos interface command. This will show you if you trust the marking of your packets or frames:
3560Switch#show mls qos interface fastEthernet 0/1
 FastEthernet0/1
 trust state: not trusted
 trust mode: not trusted
 COS override: dis
 default COS: 0
 DSCP Mutation Map: Default DSCP Mutation Map
 Trust device: none
Above you can see that we don’t trust anything at the moment. This is the default on Cisco switches. We can trust packets based on the DSCP value, frames on the CoS value, or we can trust the IP phone. Here are some examples:
3560Switch(config-if)#mls qos trust cos
Just type mls qos trust cos to ensure the interface trusts the CoS value of all frames entering this interface. Let’s verify our configuration:
3560Switch#show mls qos interface fastEthernet 0/1
 FastEthernet0/1
 trust state: trust cos
 trust mode: trust cos
 COS override: dis
 default COS: 0
 DSCP Mutation Map: Default DSCP Mutation Map
 Trust device: none
By default, your switch will overwrite the DSCP value of the packet inside your frame according to the cos-to-dscp map. If you don’t want this, you can use the following command:
3560Switch(config-if)#mls qos trust cos pass-through
The keyword pass-through will ensure that your switch won’t overwrite the DSCP value. Besides the CoS value, we can also trust the DSCP value:
3560Switch(config-if)#mls qos trust dscp
Using the command above it will not trust the CoS value but the DSCP value of the packets arriving at the interface. Here’s what it will look like:
3560Switch#show mls qos interface fastEthernet 0/1
 FastEthernet0/1
 trust state: trust dscp
 trust mode: trust dscp
 COS override: dis
 default COS: 0
 DSCP Mutation Map: Default DSCP Mutation Map
 Trust device: none
Trusting the Cos or DSCP value on the interface will set your trust boundary at the switch level. What if we want to set our trust boundary at the Cisco IP phone? We need another command for that. Take a look below:
3560Switch(config-if)#mls qos trust device cisco-phone
Use the mls qos trust device cisco-phone command to tell your switch to trust all CoS values that it receives from the Cisco IP phone:
3560Switch#show mls qos interface FastEthernet0/1
 FastEthernet0/1
 trust state: not trusted
 trust mode: not trusted
 COS override: dis
 default COS: 0
 DSCP Mutation Map: Default DSCP Mutation Map
 Trust device: cisco-phone
Maybe you wonder how the switch knows the difference between a Cisco IP phone and another vendor. CDP (Cisco Discovery Protocol) is used for this. Now we trust the CoS value of the Cisco IP phone, but what about the computer behind it? We have to do something about it…here’s one way to deal with it:
3560Switch(config-if)#switchport priority extend cos
The command above will overwrite the CoS value of all Ethernet frames received from the computer that is behind the IP phone. You’ll have to set a CoS value yourself. Of course, we can also trust the computer. There’s another command for that:
3560Switch(config-if)#switchport priority extend trust
This will trust all the CoS values on the Ethernet frames that we receive from the computer.
The commands above will let you trust traffic, but if we don’t trust anything, we can also decide to mark or remark packets and Ethernet frames on the switch. This is quite easy to do with the following command:
3560Switch(config-if)#mls qos cos 4
Just type mls qos cos to set a CoS value yourself. In the example above, I will set a CoS value of 4 for all untagged frames. Any frame that is already tagged will not be remarked with this command.
3560Switch#show mls qos interface FastEthernet0/1
 FastEthernet0/1
 trust state: not trusted
 trust mode: not trusted
 COS override: dis
 default COS: 4
 DSCP Mutation Map: Default DSCP Mutation Map
 Trust device: none
Above, you can see that the default CoS will be 4 but override (remarking) is disabled. Marking Ethernet frames with this command is useful when you have a computer or server that cannot mark its own traffic. In case the Ethernet frame already has a CoS value, but we want to remark it, we’ll have to do this:
3560Switch(config-if)#mls qos cos override
Use the keyword override to tell the switch to remark all traffic. If you receive Ethernet frames that already have a CoS value, they will be remarked with whatever CoS value you configured. Let’s verify it:
3560Switch#show mls qos interface FastEthernet 0/1
 FastEthernet0/1
 trust state: not trusted
 trust mode: not trusted
 COS override: ena
 default COS: 4
 DSCP Mutation Map: Default DSCP Mutation Map
 Trust device: none
Override (remarking) has been enabled. As a result, all tagged and untagged Ethernet frames will have a CoS value of 4. That’s all there is to trusting the CoS, DSCP, or Cisco IP phone and (re)marking your traffic. If this lesson was useful to you, please leave a comment!